54.  Connecting to a Flight Simulator
The setup procedure is different for local connections and remote (networked) connections to a flight simulator (Remote Connection).
Little Navmap can connect directly to a flight simulator running on the same computer. The Little Navconnect agent is needed if Little Navmap is used on a remote computer.
The Little Xpconnect plugin has to be installed in X-Plane to allow both Little Navmap and Little Navconnect to connect to X-Plane.
54.1. Local Connection
54.1.1. All Simulators
Open the connection dialog in Little Navmap by selecting Tools ->
Flight Simulator Connection in the main menu and choose the
simulator to which the connection should be established.
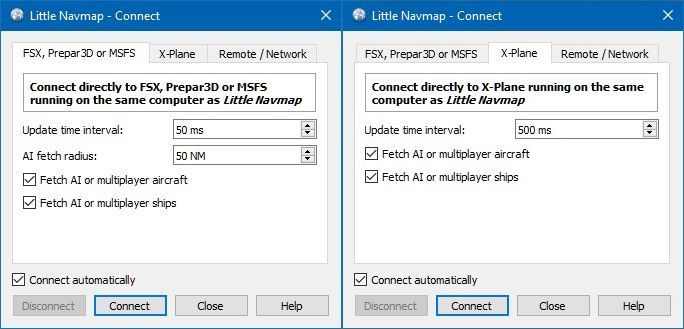
Little Navmap connect dialog set up for a local connection to FSX, P3D or MSFS on the left and X-Plane on the right. The connection will be established automatically.
Click on the tab corresponding to the simulator you want to connect to.
Now click the Connect button. The dialog will close and Little Navmap will
try to establish a connection in the background to the simulator
noted in the tab header.
Clicking Close keeps all changes and closes the dialog without
establishing a connection.
Enable Connect automatically if you do not want to connect manually.
The start order of programs does not matter if this is checked.
Little Navmap will find the simulator once it is started or when it is
already running. This is the recommended setting.
Deselect Fetch AI or multiplayer aircraft or
Fetch AI or multiplayer ships to disable the transfer of this
information to the program. This can be useful for performance reasons
if you use large amounts of AI but do not want to see it in Little
Navmap.
This option also affects the frigate and carrier in X-Plane.
54.1.2. FSX, P3D and MSFS
No plugin or separate SimConnect installaton is needed since Little Navmap comes with its own SimConnect library.
You will see an orange warning message if you use a X-Plane scenery library when trying to connect to FSX, P3D or MSFS.
Important
Note that there are two builds of Little Navmap and Little Navconnect for Windows available:
Windows 64-bit: For MSFS and all X-Plane versions. Download file is
LittleNavmap-win64-2.8.2.zipfor example.Windows 32-bit: For FSX and Prepar3D. Download file is
LittleNavmap-win32-2.8.2.zipfor example.
Make sure you use the right build. The 64-bit version shows only MSFS in the connection tab while the 32-bit version shows FSX and P3D.
54.1.3. X-Plane
You have to install the included Little Xpconnect plugin to use Little Navmap as a moving map with X-Plane 11 and X-Plane 12.
The plugin is bundled with Little Navmap but can also be downloaded separately. See Little Xpconnect for more information and installation instructions.
Select the X-Plane tab to connect.
You will see an orange warning message if you use a FSX, P3D or MSFS scenery library when connecting to X-Plane.
54.2. Remote Connection
User aircraft and weather information is transferred to Little Navmap on a remote computer by using the Little Navconnect agent on the flying computer.
Note
Airport weather information and winds aloft cannot be transferred across a remote
connection from X-Plane. You can only see the current weather around the user aircraft in the Simulator Aircraft window on the Tab Progress.
Share files and directories for X-Plane across computers and adjust loading path in Options on page Cache and Files for remote setups.
Little Navmap watches the X-Plane 11 METAR.rwx and global_winds.grib files as well as the X-Plane 12 Output/real weather directory for changes and
applies updates immediately.
See Network Setup on information how to set up a remote/networked connection.
54.2.1. Start Little Navconnect on the Flying Computer
Little Navconnect is bundled together with the Little Navmap
download archive. Start Little Navconnect (littlenavconnect.exe in Windows)
on the computer running the simulator and take note of the message that
is printed in the logging window. You only need the colored values which
tell you the name and address of the computer running the simulator. You
can use the IP address or the host name.
Little Navconnect can print multiple IP addresses or host names
depending on your network configuration. This can happen if you have
Ethernet plugged in and are connected using wireless LAN too, for
example. You have to try if you are unsure which one to use. Also make
sure to set up the Windows firewall properly to allow communication
between littlenavmap.exe and littlenavconnect.exe on both
computers.
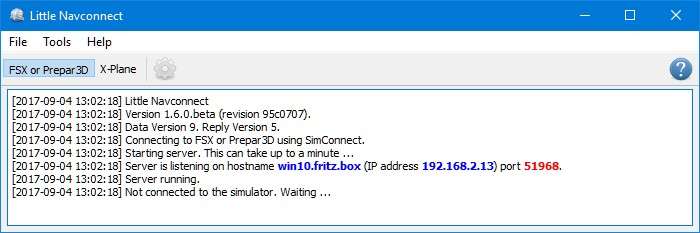
Little Navconnect is
running and waiting for a Flight Simulator. It is running on the
computer win10.fritz.box with the IP address 192.168.2.13.
Change the port in Little Navconnect’s Options dialog if you see
an error message like shown below:
[2016-07-27 16:45:35] Unable to start the server: The bound address is already in use.
Note
A common reason for failing connections are firewall settings which block the connection attempts.
54.2.2. Start Little Navmap on the Client / Remote Computer
Open the connection dialog in Little Navmap by selecting Tools ->
Flight Simulator Connection in the main menu.
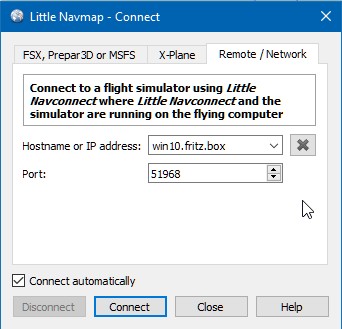
Connect dialog with correct values to access the computer running the simulator and Little Navconnect as shown above.
Now do the following after opening the dialog:
Click the
Remote / Networktab.Add the value for host name. This can be either the host name or the IP address printed by Little Navconnect.
Check the value for the port.
51968is the default value and usually does not need to be changed.Click connect. The dialog will close and Little Navmap will try to establish a connection in the background.
Establishing a connection can take some time, depending on your network.
The aircraft will show up on the map and on the Simulator Aircraft
dock window once a flight is set up and loaded on the simulator. If no
flight is loaded yet (i.e. the simulator still shows the opening
screen), you will see the message Connected. Waiting for update. in
the Simulator Aircraft dock window.
Note that it can take a while until an error is shown if you used the wrong values for host name or port.
Selecting Connect automatically is recommended. The start order of
all three programs (simulator, Little Navconnect and Little Navmap)
does not matter if this is checked and the programs will find each
other.
Deselect Fetch AI or multiplayer aircraft or
Fetch AI or multiplayer ships in Tools -> Options of Little
Navconnect to disable the transfer of this information across the
network. This can be useful for performance reasons if you use large
amounts of AI but do not want to see it in Little Navmap.
54.3. Connect Dialog
Disconnect: Disconnect the current session and stop automatic reconnect.Connect: Try to connect. An error dialog will be shown if no connection can be established. Little Navmap will constantly try again ifConnect automaticallyis enabled.Close: Close the dialog without any changes to the current connection status.Connect automatically: Little Navmap will try to connect constantly if this is enabled. This is the recommended setting.All connection attempts will stop immediately if you deselect this button.
You have to click
Connectonce to start the automatic connection attempts after checking this button.
Update Time Interval: Allowed range is 50 milliseconds up to 1 second. Little Navmap fetches data from a simulator using this time interval. Increase this value if you experience stutters or lag in the simulator. A lower value will result in more fluid map updates in Little Navmap.Fetch AI or multiplayer aircraftandFetch AI or multiplayer ships: Disables fetching of AI vehicles. These settings are applied immediately.AI Fetch Radius: Limits the number of AI aircraft around the user aircraft. Only for FSX, P3D and MSFS.