55.  Options
This dialog consists of several pages with configuration options which can be selected in the list on the left side. Each entry in the page list has a tooltip for easier navigation.
Note that scroll bars can show up at the left or the bottom of a options page. Scroll to see hidden options.
Tip
Most options are self-explaining and tooltips contain more information in most cases. Hover the mouse over a button or input field for a more detailed description.
The button Restore Defaults restores only the options of this dialog
back to default. Other settings like map display, table views or dock
window positions are not affected. You can press Cancel to close the
dialog and undo this action.
To reset all saved settings completely see Reset all Settings and Restart.
The following chapters give a brief description of each page.
Using the help button in the options dialog window jumps directly to the related chapter for a page.
Tip
You can immediately check the effect of your changes on the map display
by moving the dialog Options to the side and pressing Apply.
Note
The menu entry which is referenced as Tools -> Options in this manual
for Windows and Linux
can be found in the application menu at Little Navmap -> Preferences on macOS.
55.1.  Startup and Update
Allows to customize what should be loaded and shown on startup of Little Navmap.
55.1.1. Load last used flight plan
This function allows to restore the last saved or edited flight plan on startup.
- Selected
The last saved flight plan file or the last edited flight plan will be reloaded on startup.
You can exit Little Navmap without saving a new plan. All changes will be restored on next startup.
Little Navmap will also not ask to save an already saved but changed plan on exit but instead saves the changes to a temporary file. The changes and the last saved file will be restored on next startup.
- Not selected
The last saved flight plan will not be reloaded on startup.
Little Navmap will ask to save a plan on exit if it has been changed.
55.1.2. Update Check
You can also configure the frequency of the automatic update check and channels. See chapter Updates for more information.
Important
Always update Little Navmap to the latest version which usually contains many improvements and bug fixes. Old versions are not supported.
55.2.  User Interface
This page contains options to force the program language and locale settings (number, date and time formats) to English if you do not want to use a translated user interface.
55.2.1. Language
Allows to choose the language freely among the supported translations. Note that some translations are incomplete which might result in a mix of English and translated phrases in the user interface.
You have to restart Little Navmap for this change to take effect.
55.2.3. Raise and activate docking windows when moving the mouse over it
Raises dock windows when hovering the mouse over it. This can be helpful if you have multiple floating dock windows opened.
See also Dock Windows.
55.2.4. Raise and activate the main program window when moving the mouse over it
Raises the main window of Little Navmap when hovering the mouse over it. This will steal the focus of other programs and activate Little Navmap which might cause unwanted effects. Therefore, try this out before using it.
See also Dock Windows.
55.3.  Display and Text
Various user interface related settings.
55.3.1. User Interface Font
You can change the font for the whole user interface of Little Navmap.
The setting is applied immediately. Press Cancel or Reset Font to Default to revert back to previous.
The font for map display is not affected by this value and can be set separately on page Map Display.
Warning
Keep in mind that using a wrong or too large font can result in display issues.
Tip
Try out the B612 Font family which is an open source font family designed and tested to be used on aircraft cockpit screens.
55.3.2. Enable high DPI monitor support
Toggle this is you have problems with scaled fonts on Windows, cannot shrink the main window or other issues.
You have to restart Little Navmap after changing.
55.3.3. Disable tooltips for whole application
Disables tooltips for the whole application except for the map window which has separate settings on page Map.
Useful for experienced users.
55.3.4. Text Size
Change default text size for various information displays.
Tip
You can temporarily resize the text in information windows by using Ctrl+Wheel.
This change is not saved.
55.4.  Units
Units
You can change all units that are used by Little Navmap on this page between nautical, imperial and metric. Mixed settings like meter for altitude and nautical miles for distance are possible.
Show other fuel units too: Shows kilogram and liter as small text besides main units if lbs and gallon are selected and vice versa. This is applied only to the most important fuel values like block and trip fuel, for example.Show true course and heading besides magnetic course in information displays: Add true heading as small text besides magnetic heading displays. This applies to information, progress as well as map display (traffic patterns and holds).
Note
See Signed Decimal Formats for more information when using Latitude and Longitude with sign
or Longitude and Latitude with sign since these modes also affect coordinate input.
The format Degree, Decimal Minutes for Google is useful for input into Google Maps or Google Earth.
Warning
Note that any numbers used in the program are not converted when
changing units. That means that you will get a minimum altitude buffer
of 1,000 meter after changing the setting Altitude and Elevation from
feet to meter. This also applies to flight plan altitude. Therefore, do
not forget to adapt these numbers after changing units.
55.5.  Map
Map
Has map related customization options. Allows to set the tooltips, scroll performance and more.
Hover the mouse above buttons and input fields to see more information.
55.5.1. Allow to undock the map window
Allows to undock and put the map window into a floating state which also results in more flexibility when positioning other dock windows.
This can cause several unwanted effects when arranging dock windows. Uncheck this if you do experience problems when resizing dock windows.
You have to restart the program after changing this option.
See Window Layout for more information about window layouts which might be affected by this option.
Important
You need to reset the window layout in case the map window is missing after a restart.
Use menu Window -> Reset Window Layout in the main menu to clean up the layout.
55.6.  Map Navigation
Contains all options for moving and zooming around in the map as well as click sensitivity and zoom distances.
Three navigation modes are available. Tooltips give more information about these.
55.7.  Map Display
This page contains options for symbol sizes, text sizes, flight plan, user aircraft trail colors and more.
Use the scroll bar on the right to see more hidden options at the bottom.
Symbol allows to adjust icon size of a feature type, Text can be used to adjust label size
independent of the symbol, Text Background places the labels in a white rectangle if
selected and Line Width adjusts flight plan and other line thickness.
Change colors by clicking on the colored buttons.
The option Hide aircraft on ground can be used to avoid hiding aircraft on ground at higher zoom levels. Disabling this can help
to avoid hidden AI if traffic tools do not update the on-ground status of aircraft properly.
55.7.1. Map and Elevation Profile Font
You can change the font for the map display. The font will also be used in the elevation profile.
55.8.  Map Display Flight Plan
Change display options affecting map and partly elevation profile display. In the tooltips you will find information about whether the corresponding setting affects the altitude profile or not.
Input fields are the same types as on page Map Display.
55.9.  Map Display User
More display options for user features like range rings, measurment lines, highlights, userpoints and more.
Input fields are the same types as on page Map Display.
55.10.  Map Display Labels
This page contains a tree view that allows to select the text labels that should be shown at airports, user aircraft, AI/multiplayer aircraft and other map features.
Furthermore airport details like aprons or taxiways can be enabled or disabled in the branch Airport Details.
The dialog uses a tree. See Trees for more information about this type of input element.
55.11.  Map Display Keys
On this page you can enter login information, tokens or API keys for map services which need an user account.
The required keys shown are extracted from the installed map themes. See Map Themes for more information about map themes.
The following map themes requiring an account come with Little Navmap:
Mapbox also allows user customized maps in Mapbox Studio. See the Mapbox page for help. Click
Add Mapbox User Mapto add an user styled map to Little Navmap.
A restart might be needed after changing keys.
Click one of the following links to go directly to the account pages of the respective map services. You need to sign in.
Warning
Do not show these keys publicly in forums on screenshots.
55.11.1. Map Web Service Configuration
Click the images to enlarge.
55.11.1.1. Mapbox
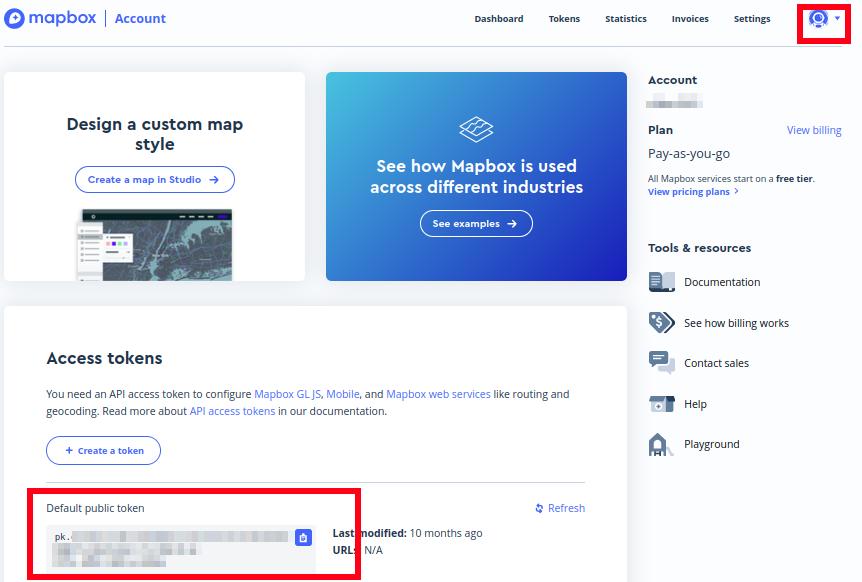
Location of the Mapbox access token on the Mapbox Account page.
Use this as Value for Mapbox Token.
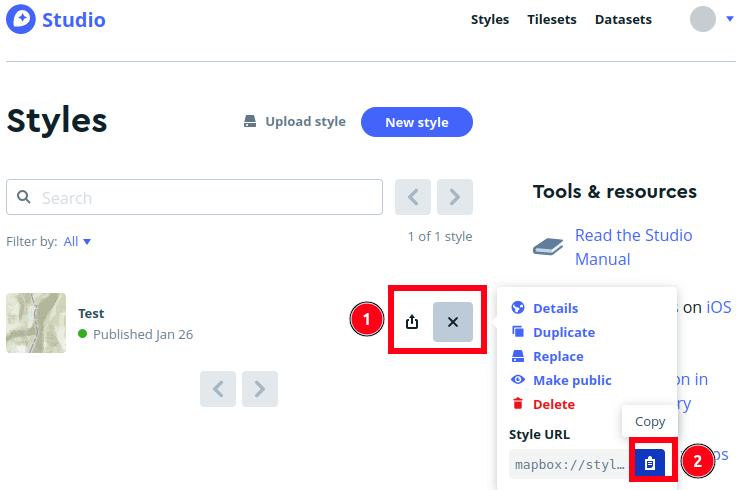
Location of the Mapbox Studio URL on the Mapbox Studio page
Insert this URL into the Add Mapbox User Map dialog window to add an user styled map to Little Navmap.
55.11.1.2. Thunderforest
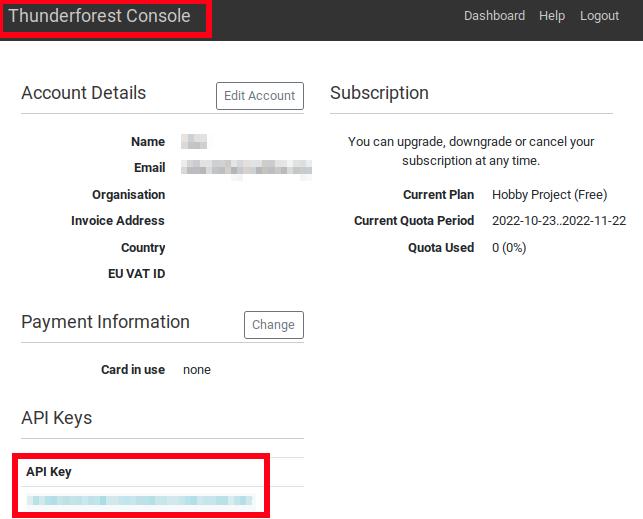
Thunderforest Console with API key.
Use this as Value for Thunderforest API Key.
55.11.1.3. Maptiler
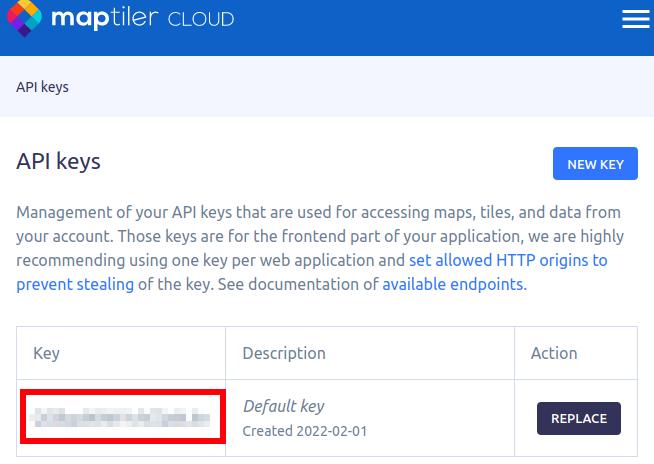
Maptiler Cloud Account API key page.
Use this as Value for MapTiler API Key.
55.12.  Map Display Online
This page allows to change the default center circle sizes for online centers.
Two options below Online Center Boundary Lookup in User Airspaces
can be used to assign OpenAir airspaces from the user airspace database
to centers by matching filename or airspace name with the callsign of
the center.
By airspace name vs. callsign: Use the airspace name within a file to assign the geometry to a center by callsign.By airspace file name vs. callsign: Use the airspace filename minus the.txtextension to assign the geometry to a center by callsign.
See Online Airspaces for more information.
55.13.  Simulator Aircraft
Allows to change various aspects around the display of the user aircraft
55.13.1. Simulator Aircraft Updates
Settings resulting in a more fluid aircraft display will use more CPU and can potentially induce stutters in the simulator.
55.13.2. Aircraft Centering Options
This chapter explains the various options to modify the map updates while flying. The idea is to reduce manual scrolling or zooming as much as possible while piloting the aircraft.
Read the chapters below if you find the behavior confusing (i.e. map jumping unexpectedly). Otherwise leave the default values.
See User Aircraft Centering for general information about aircraft centering while flying.
55.13.2.1. Center map on aircraft and next flight plan waypoint
The map is zoomed to show both the aircraft and the next active waypoint on the flight plan if this is enabled while flying. Little Navmap uses several criteria to minimize map updates in this mode.
The map will fall back to the default mode of simply centering the aircraft if one of the conditions below is true:
No flight plan loaded.
Aircraft is on ground (no active magenta leg).
Aircraft distance to flight plan is more than 40 NM (active magenta leg disappears).
You can change the zoom freely if the fall back is active.
55.13.2.2. Do not use box mode for following the aircraft. Move the map constantly.
Map will follow the aircraft constantly when checked. This is also used
for Center map on aircraft and next flight plan waypoint.
This option will cause Little Navmap to consume more CPU resources while flying.
55.13.2.3. Simulator aircraft scroll box size (percent of map window size)
Smaller values keep the aircraft centered and will move the map more often. Larger values will update the map only when aircraft reaches map boundary.
This setting is only applicable if Center map on aircraft and next flight plan waypoint above is disabled.
55.13.2.4. Allow scrolling and zooming in the map and jump back to aircraft after
This setting allows a user to move around in the map without the need to manually disable the aircraft centering.
Time until aircraft following is activated again after any manual map interaction like scrolling or zooming.
You cannot move the user aircraft out of view if this option is disabled. The map will jump back immediately.
This option is also used in the Elevation Profile.
- Allow scrolling enabled:
The map will stop following the aircraft for the given time if the user does any interaction with the map like scrolling or zooming. You can quickly check out the destination or your overall progress, and after you stop moving around, Little Navmap will return to following your aircraft.
This option is also used in Elevation Profile.
Toggle

Center Aircrafton and off if you find that the map jumps back to the wrong position.- Allow scrolling disabled:
Map will constantly follow the aircraft and will not allow moving away from it.
The aircraft centering will be switched off only when using one of the following functions:
Double-click into a table view or map display to zoom to an airport or a navaid.
Context menu item
Show on map.Goto HomeorGoto Center for Distance Search.Maplink inInformationdock window.Show Flight Plan, when selected manually, or automatically after loading a flight plan.Centering a Google Earth KML/KMZ file after loading
This allows a quick inspection of an airport or navaid during flight. To display the aircraft again use
Map Position Back( Map Position Back/Forward) or enable Keep User Aircraft Centered again.
55.13.2.5. Zoom out on takeoff
Zooms out to a fixed zoom distance when a takeoff is detected.
This setting is only applicable if Center map on aircraft and next flight plan waypoint above is disabled.
55.13.2.6. Zoom in on touchdown
Zooms in to a fixed zoom distance to show airport details when a takeoff is detected.
55.13.2.7. Scroll flight plan table back to active leg after
The active (magenta) leg will be moved to the top of the flight plan table when a new leg is activated or there is no interaction with the table for the given time period.
55.13.2.8. Clear selection in flight plan table after
The selection in the flight plan table and highlights on the map will be cleared after there is no interaction with the table for the given time period.
55.13.2.9. Highlight active flight plan legs
Shows active flight plan legs in magenta color (default) on the map and in the flight plan table.
55.13.2.10. Maximum number of aircraft trail points:
Limits the number or aircraft trail to avoid performance issues when showing a too large number of trail points.
55.14.  Flight Plan
Here you can set preferences for flight plan calculation or change the default filename for saving flight plans in LNMPLN format.
Note
Note that the default filenames for exporting flight plans from the menu File are set in in the Multiexport Options Dialog.
55.14.1. Avoid overwriting Flight Plan with not matching departure and destination
Check this option to avoid overwriting LNMPLN files with wrong flight plans after changing, departure, destination or any other parameter used in the flight plan file.
The dialog Save Flight Plan as LNMPLN will show up instead of overwriting the current flight plan when you reverse the route, for example.
55.14.2. Pattern for default LNMPLN flight plan names
Allows to customize the default file name which is proposed on first save of LNMPLN files ( Save Flight Plan and Save Flight Plan as LNMPLN).
See Flight Plan Multiexport for more information about how to customize the default file names for other flight plan formats which can be exported.
Error messages and an example is shown below the input field.
This applies to new filenames when saving LNMPLN flight plans.
The file suffix .lnmpln is added automatically.
The default value is PLANTYPE DEPARTNAME (DEPARTIDENT) to DESTNAME (DESTIDENT).
The input field falls back to the default if it is left empty or has errors.
The following variables are recognized:
PLANTYPE: TextIFRorVFRdepending on Flight Plan Type.DEPARTIDENT: Departure airport identDEPARTNAME: Departure airport nameDESTIDENT: Destination airport identDESTNAME: Destination airport nameCRUISEALT: Cruise altitude in selected unit (meter or feet).
All variables have to be entered in upper case letters. Other characters are used as entered.
55.14.2.1. Short
This button sets the flight plan file pattern to the short name DEPARTIDENT DESTIDENT.
Example: EDDF LIRF.lnmpln.
55.14.2.2. Long
This button sets the flight plan file pattern to the long name PLANTYPE DEPARTNAME (DEPARTIDENT) to DESTNAME (DESTIDENT).
Example: IFR Frankfurt am Main (EDDF) to Fiumicino (LIRF).lnmpln.
55.15.  Weather
Choose which weather services should be used to fetch and show METAR for airports in information window and map tooltips.
The weather type Flight Simulator will either display weather from
the FSX or P3D connection or from X-Plane’s weather files.
The weather for a service is downloaded or read on demand when you enable the corresponding service for tooltips or information panels.
Online weather is downloaded and updated every ten minutes.
Note
Simulator weather is not supported for Microsoft Flight Simulator 2020.
55.16.  Weather Files
Active Sky can only be selected if either Active Sky Next, AS16, Active Sky for Prepar3D v4 or Active Sky XP are installed or the weather file is selected directly. Selecting the Active Sky weather file directly can be useful if you run a networked setup. Use Windows shares or a cloud service to get access to the file on the remote computer.
The URLs of various weather services can be modified if you like to use another source. Usually there is no need to change these values.
You can change the path to the X-Plane weather files if you’d like to load it on a remote computer using a network share.
The buttons Test for the online weather services can also be used to
find out if Little Navmap can connect to Internet. Check your firewall
settings if these fail.
Use Reset to set a value back to default if you change something accidentally.
Note
While this happens rarely, some public services like NOAA might be interrupted for hours. Little Navmap will show error messages if this is the case.
You might want to check you internet access but otherwise ignore these if it does not happen for a longer time.
55.17.  Online Flying
This page allows to change settings for online networks.
VATSIM, IVAO and PilotEdge provide pre-configured options to connect to the services.
Use Custom with status file if you have a status file pointing to whazzup.txt files.
Use Custom if you’d like to load a whazzup.txt file directly.
See Online Networks for an overview.
Tip
The custom options can be used for internal networks or tools like the Transmitter which can be used for small flying groups and MSFS which does not provide multiplayer traffic on its interface.
55.17.1. Online Service
55.17.1.1. None
Disables all online services and hides all related window tabs, menu items and toolbar buttons. No downloads will be done.
55.17.1.2. VATSIM
Uses the predefined configuration for the VATSIM network. No other settings are needed.
The update rate depends on configuration and is typically three minutes.
55.17.1.3. IVAO
Uses the predefined configuration for the IVAO network. No other settings are needed.
The update rate depends on configuration and is typically three minutes.
55.17.1.4. PilotEdge
Configuration for the PilotEdge network.
55.17.1.5. Custom with Status File
This option allows to connect to a private network and will download a
status.txt file on startup which contains further links to e.g. the
whazzup.txt file.
55.17.1.6. Custom
This option allows to connect to a private network and will periodically
download a whazzup.txt file which contains information about online
clients/aircraft and online centers/ATC.
55.17.2. Web Addresses
55.17.2.1. Status File URL
Web address of the status.txt file. You can also use a local path like
C:\Users\YOURUSERNAME\Documents\status.txt.
This file is downloaded only on startup of the Little Navmap.
A button Test allows to check if the URL is valid and shows the
first few lines from the downloaded text file. This does not work with
local paths.
The status file format is explained in the IVAO documentation library: Status File Format.
55.17.2.2. Whazzup File URL
Web address of the whazzup.txt file. You can also use a local path like
C:\Users\YOURUSERNAME\Documents\whazzup.txt.
This file is downloaded according to the set update rate.
A button Test allows to check if the URL is valid. The test
does not work with local paths.
The whazzup file format is explained in the IVAO documentation library: Whazzup File Format.
whazzup.txt example: !GENERAL
VERSION = 1
RELOAD = 1
UPDATE = 20181126131051
CONNECTED CLIENTS = 1
CONNECTED SERVERS = 41
!CLIENTS
:N51968:N51968:PILOT::48.2324:-123.1231:119:0:Aircraft::::::::1200::::VFR:::::::::::::::JoinFS:::::::177:::
!SERVERS
...
55.17.2.3. Update Every
Sets the update rate that defines how often the whazzup.txt file is
downloaded.
Allowed values are 1 to 1,800 seconds.
You can use smaller update rates for private online networks to improve map display updates.
Warning
Do not use update rates smaller than two minutes for official online networks. They might decide to block the application or block you based on your internet address if downloads are excessive.
55.17.2.4. Format
IVAO or VATSIM. Depends on the format used by your private
network. Try both options if unsure or you see strange effects like all aircraft pointing to the north.
55.18.  Web Server
Configuration options for the internal web server of Little Navmap.
Document root directory: The root directory of the web server pages. Change this only if you would like to run a customized web server using your own style sheets and you own HTML templates.Select Directory ...: Select root directory. Little Navmap will show a warning if noindex.htmlfile is found in the root directory.Port number: Default 8965. That means you have to use the addresshttp://localhost:8965/in your browser to access the web page of Little Navmap, for example. Change this value if you get errors likeUnable to start the server. Error: The bound address is already in use..Use encrypted connection (HTTPS / SSL): Encrypted connections use a pre-computed self-signed certificate which comes with Little Navmap. A browser will show an error message if using this certificate and requires to add a security exception. The encrypted address ishttps://localhost:8965/, for example. Creating a self signed certificate is quite complex. Look at the various web articles by searching forHow to create a self signed certificate.Start Server: Start or stop the server to test the changes above. The server status (running or not running) is reverted to the previous state when pressingCancelin the options dialog.Label
Web Server is running at http://my-computer:8965 (IP address http://192.168.1.1:8965): Shows two links to the web server. Clicking on either one opens the page in your default browser. You can always try the IP address link if the first link using the computer name does not work.
See Web Server for detailed information.
55.19.  Cache and Files
55.19.1. Map Display
Here you can change the cache size in RAM and on disk. These caches are used to store the downloaded images tiles from the online maps like the OpenStreetMap or OpenTopoMap.
All image tiles expire after two weeks by default and will be reloaded from the online services then.
You can delete the files manually using your file manager.
You can also open the cache directory from menu Tools -> Files and Directories -> Show Map Cache or by
clicking on the button Show Disk Cache in File Manager.
The RAM cache has a minimum size of 100 MB and a maximum size of 2 GB.
The disk cache has a minimum size of 500 MB and a maximum size of 8 GB.
See chapter Disk Cache for information on cache locations.
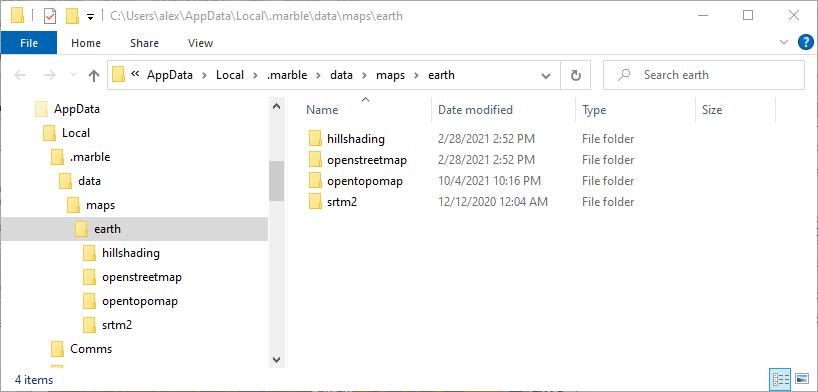
The map cache directory on Windows showing caches for four map themes. Delete all or any of these to save space. Click image to enlarge.
55.19.2. Map Display Themes
You can select a directory to lookup additional map themes for the background map layer.
Each map theme has to consist of a directory containing the related .dgml and other files.
See Map Themes for installation instructions.
External map themes are ignored if this field is empty.
55.19.3. Install GLOBE elevation data
The online elevation data which is used per default contains several known errors. Therefore, it is recommended to use the freely downloadable GLOBE offline elevation data.
The bottom part of the page Cache and Files in the options dialog allows to install the elevation data from the
GLOBE - Global Land One-km Base Elevation Project .
Follow the instructions below to install the GLOBE elevation data:
Click the link in the dialog or click here to open the page. Click
Get dataon the web page and thenAny or all 16 "tiles". Then clickAll Tiles in One .zip fileto download the file.The direct download link is all10g.zip.
Extract the downloaded file
all10g.zipto an arbitrary place like...\Documents\Little Navmap\GLOBE. You can also use the folder which is suggested by the Directories dialog. As a result you will get a folderall10containing filesa10gtop10g.Open the options dialog in Little Navmap and click on
Cache and Fileson the left side.Select
Use Offline GLOBE Elevation Dataon theCache and Filespage in the options dialog.Now select the extracted directory
all10using theSelect GLOBE Directory ...button on this options page. The label in the options dialog will show an error if the path is not correct.Click
Okif the path was recognized and the label below showsDirectory and Files are valid.
55.20.  Scenery Library Database
Allows to configure the loading of the scenery library database.
Note that these paths apply to all Flight Simulators, FSX, P3D, MSFS and X-Plane.
You have to reload the scenery database in order for the changes to take effect.
Little Navmap supports linked scenery which is linked by Symbolic links (all operating systems),
Windows shortcuts, Windows junctions and macOS aliases. Note that this functionality is limited to
the MSFS Community and X-Plane Custom Scenery directories. Other combinations are not tested.
55.20.1. Scenery library directories to include when loading
This list shows extra directories which are loaded additionally when reading the simulator scenery library.
Add-on airports in the extra directories extending MSFS Community, X-Plane Custom Scenery or FSX/P3D Addon Scenery are
read when loading the simulator scenery library database.
Note that airport files in this list are always read last which can affect the display in MSFS, FSX or P3D.
Note
The add-ons must be at the top level for the selected directory and will not be read recursively.
55.20.2. Scenery library directories or files to exclude from loading
All directories including sub-directories as well as files in this list will be omitted when loading the scenery library into the Little Navmap database. You can also use this list to speed up database loading if you exclude directories that do not contain airports or navaids (landclass, elevation data and others).
You can also exclude FSX, P3D, MSFS BGL or X-Plane apt.dat files if needed.
Select one or more entries in the list and click on Remove to delete
then from the list.
Tip
Note that you can select more than one entry in the file dialog to add several entries at once.
55.20.3. Scenery library directories to exclude from add-on recognition
FSX/P3D: All scenery data that is found outside of the base flight
simulator Scenery directory is considered an add-on and will be
highlighted on the map as well as considered during search for add-ons.
X-Plane: All airports in the Custom Scenery directory are
considered add-on airports and will be highlighted accordingly.
Microsoft Flight Simulator 2020: All airports located in the Community
directory and the Official\OneStore or Official\Steam are considered to be add-on airports.
Exceptions are fs-base, fs-base-genericairports and fs-base-nav.
You can use this list to modify this behavior.
Add-ons, like Orbx FTX Vector or fsAerodata add scenery files that
correct certain aspects of airports like elevation, magnetic declination
or others. All these airports will be recognized as add-on airports
since all their files are not stored in the base flight simulator
Scenery directory.
Insert the corresponding directories or files into this list to avoid unwanted highlighting of these airports as add-ons.
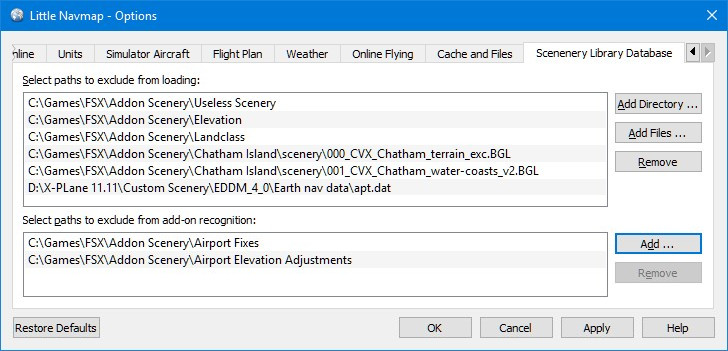
Page Scenery Library Database with three
directories and three files excluded from loading and two directories
excluded from add-on recognition.
55.20.4. Examples
Provided your simulator is installed in C:\Games\FSX.
55.20.4.1. ORBX Vector
Exclude the directories below from add-on recognition. Do not exclude them from loading since you will see wrong airport altitudes.
C:\Games\FSX\ORBX\FTX_VECTOR\FTX_VECTOR_AECC:\Games\FSX\ORBX\FTX_VECTOR\FTX_VECTOR_APT
55.20.4.2. Flight1 Ultimate Terrain Europe
Exclude these directories from loading to speed up the process:
C:\Games\FSX\Scenery\UtEurAirportsC:\Games\FSX\Scenery\UtEurGPC:\Games\FSX\Scenery\UtEurLightsC:\Games\FSX\Scenery\UtEurRailC:\Games\FSX\Scenery\UtEurStreamC:\Games\FSX\Scenery\UtEurWater
55.20.4.3. ORBX Regions
Exclude these directories from loading:
C:\Games\FSX\ORBX\FTX_NZ\FTX_NZSI_07_MESHC:\Games\FSX\ORBX\FTX_NA\FTX_NA_CRM07_MESHC:\Games\FSX\ORBX\FTX_NA\FTX_NA_NRM07_MESHC:\Games\FSX\ORBX\FTX_NA\FTX_NA_PNW07_MESHC:\Games\FSX\ORBX\FTX_NA\FTX_NA_PFJ07_MESH