64. Tutorial - Building a VFR Flight Plan
64.1. General
This tutorial shows how to create a simple flight plan based on the map and its context menus.
The flight plan is included in the Little Navmap installation directory:
.../Little Navmap/etc/Tutorial VFR Meythet (LFLP) to Challes-les-Eaux (LFLE).lnmpln.
The airport names might differ depending on simulator.
Use the map theme Stamen Terrain in menu View -> Theme to see the mountains.
The flight will only go through Class E airspace. There is no need to contact ATC.
Disable airspace display in menu View -> Show Airspaces for now.
The flight takes us through the valleys of the French alps. You can use this flight plan for any small aircraft like the default Cessna C172 which is available for all simulators.
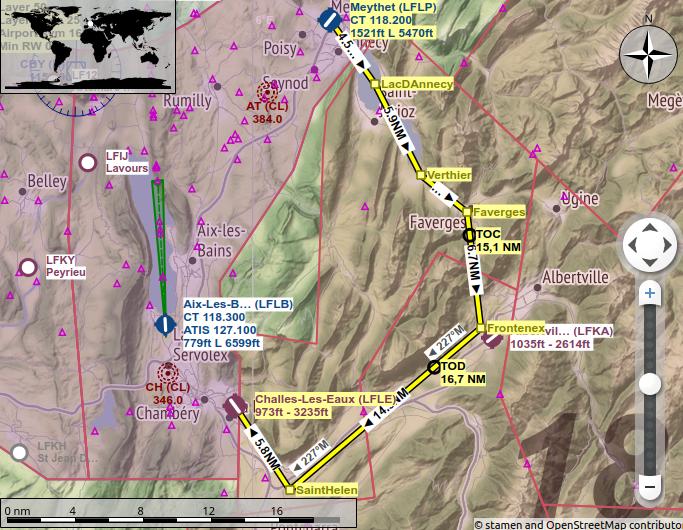
The flight plan is: Meythet (LFLP) / Runway 04 to Challes-Les-Eaux (LFLE) Distance 41 NM, time 0 h 24 m.
64.2. Prepare Flight
I’d recommend to get use Flight -> Reset all for a new Flight
![]() before each flight to get a clean base for
fuel calculation and other functions. Uncheck
before each flight to get a clean base for
fuel calculation and other functions. Uncheck
Create an empty flight plan in the dialog if your plan is
already loaded.
64.3. Default Aircraft Performance
This tutorial does not cover creating or collecting aircraft performance files. See Tutorial - Creating an Aircraft Performance Profile if you like to do this.
Therefore, we will simply use the default example performance profile based on a Cessna C172.
Select Aircraft -> New Aircraft Performance ![]() . Accept the default values by pressing
. Accept the default values by pressing OK in the
dialog.
64.4. Departure Airport
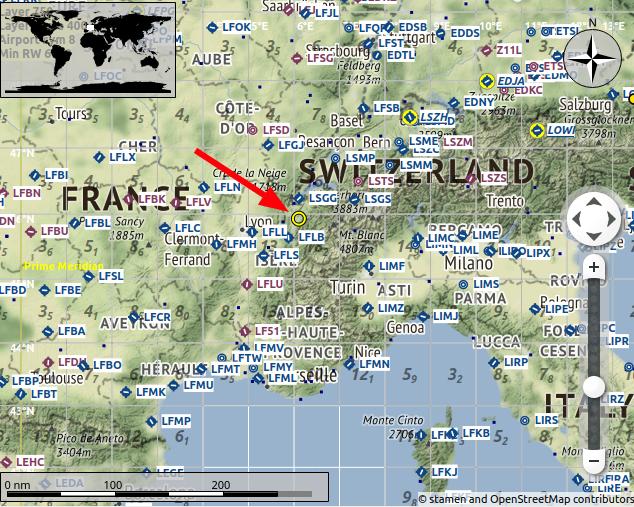
Find the departure airport: Click into the map and zoom to the French Alps. You can use the following functions to navigate:
The map overlay on the right.
The mouse (click and drag) to move and the mouse wheel to zoom.
The cursor keys to move and the keys
+and-for zooming in and out (click into the map window or pressF2to activate it before using the keys).
Use the back ![]() and forward
and forward ![]() buttons to jump in the
position history like in a web browser.
buttons to jump in the
position history like in a web browser.
See also Map Display.
Look for the departure airport Meythet (LFLP) around here:
Closer with tooltip:
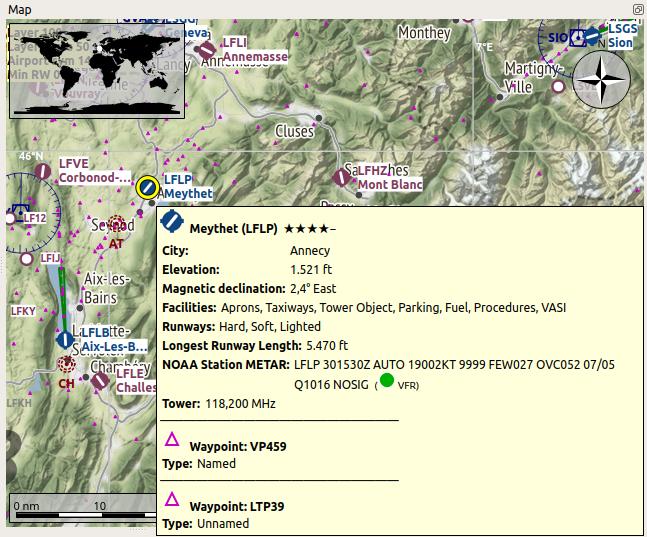
Now:
Zoom in until you see the airport diagram showing taxiways, runway details, parking positions and more.
Zoom in further until you see the white parking numbers.
Right-click on the center of one of the green ramp parking spots (11 is used here).
Choose
Set Parking 11 at Meythet (LFLP) as Departure ( Set as Departure) in the context
menu.
( Set as Departure) in the context
menu.
The airport layout and parking spot will be different depending on used simulator.
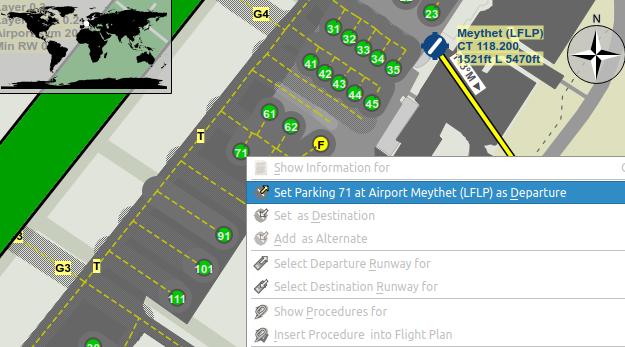
This will select your departure parking position which will be highlighted by a black/yellow circle. The airport will be added to the flight plan as departure too.
You can also click on the airport icon and select it for departure. The airport center will be automatically assigned as departure position.
64.5. En-Route Waypoints
Add the waypoints now:
Scroll along the valley to the south east across the lake Lac d’Annecy.
Click Append Position to Flight Plan
 . The clicked position will be added as an user defined waypoint (green rectangle)
to the end of your plan.
. The clicked position will be added as an user defined waypoint (green rectangle)
to the end of your plan.
Click undo ![]() or redo
or redo ![]() in the toolbar if you don’t like what you just added.
in the toolbar if you don’t like what you just added.
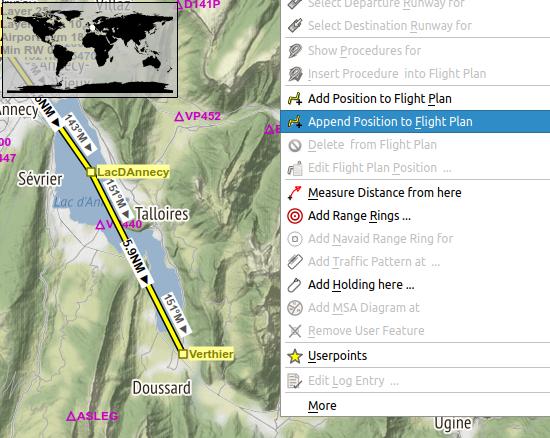
Another function is Add Position to Flight Plan ![]() which will insert the clicked position to the nearest
flight plan leg. You can use this to add user defined positions,
airports or navaids in the middle of a flight plan. The nearest leg will
be chosen automatically by Little Navmap for inserting the new position.
which will insert the clicked position to the nearest
flight plan leg. You can use this to add user defined positions,
airports or navaids in the middle of a flight plan. The nearest leg will
be chosen automatically by Little Navmap for inserting the new position.
Little Navmap will automatically assign names to the user defined waypoints. You can leave these as they are or replace them with a more meaningful name.
Waypoints using the default format WP plus number (e.g. WP1 or WP99) are automatically
renumbered to reflect the flying order in the flight plan.
Right-click on the user waypoint and select
Edit Flight Plan Position WP1 ![]() ( Edit Flight Plan Position or Edit Flight Plan Position Remarks) to change
a waypoint ident, name, remarks or its coordinates. Use nearby villages, mountains,
lakes or other points of interest. Do not change the coordinates now.
( Edit Flight Plan Position or Edit Flight Plan Position Remarks) to change
a waypoint ident, name, remarks or its coordinates. Use nearby villages, mountains,
lakes or other points of interest. Do not change the coordinates now.

Keep adding points and stay away from the mountains until you’re at
Challes-les-Eaux (LFLE).
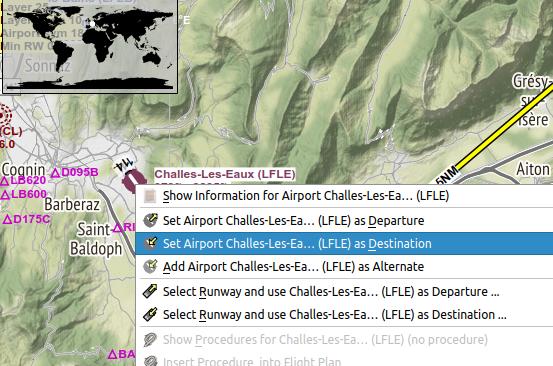
64.6. Destination Airport
To add the destination:
Right-click on
Challes-les-Eaux (LFLE)Select
Set Airport Challes-les-Eaux (LFLE) as Destination ( Set as Destination).
Now there is a flight plan. Yours might look a bit different.
You can also use the drag and drop feature to move points or add new
ones. Enable it by checking Flight Plan ->
Edit Flight Plan on Map ![]() and click on a
flight plan waypoint to move it. Click on a flight plan leg to add a new
waypoint into this leg. See Map Flight Plan Editing for information on this function.
and click on a
flight plan waypoint to move it. Click on a flight plan leg to add a new
waypoint into this leg. See Map Flight Plan Editing for information on this function.
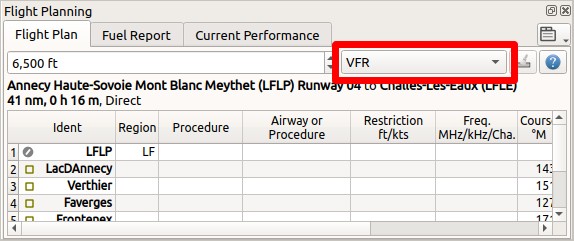
64.7. Cruise Altitude
Change the flight plan type to VFR if not already done.
Now check the cruise altitude:
Look at the flight plan elevation profile. There is a red line indicating the minimum safe altitude.
Adjust the flight plan cruise altitude until you’re above the red line.
Select
Flight Plan-> Adjust Flight Plan Altitude to get the correct altitude adjusted by the
hemispherical rule.
to get the correct altitude adjusted by the
hemispherical rule.
Note that the default hemispherical rule is not correct for France until you change it in the options dialog, but avoid this for the sake of simplicity now.

You probably noticed that you will get close to ground near the destination. Be prepared to circumvent some mountains there.
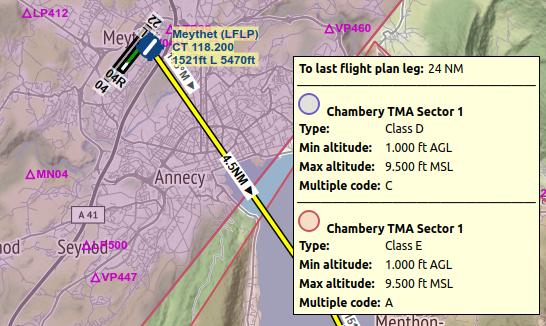
64.8. Airspaces
Now look if your flight plan touches any airspaces.
Click into one of the airspaces nearby start and destination and have a look at the information dock window. There are several airspaces:
Geneva TMA Sector 8which starts at 9,500 ft above mean sea level (MSL). This is higher than our cruise altitude and won’t affect us.Two Class E airspaces. The information window notes for these:
Controlled, IFR and VFR, ATC clearance required for IFR only. No problem because we will fly using VFR.
The situation is similar at the destination.
Note that you might find different airspaces depending if you use the latest navdata or stock airspace data.
64.9. Saving
Save the plan in the Little Navmap format LNMPLN using File ->
Save Flight Plan ![]() .
The program usually finds the right directory for the flight plans and
gives a meaningful name by default.
.
The program usually finds the right directory for the flight plans and
gives a meaningful name by default.
The format LNMPLN is only understood by Little Navmap. You cannot load these files into another program. Therefore, we have to export the flight plan.
Now open the multiexport options dialog by selecting File -> Multiexport Flight Plan Options.
Right click on the simulator format you’d like to export and select Export Flight Plan now ![]() .
Save the file to the right place. The default path is based on best guess. Adjust it as needed.
.
Save the file to the right place. The default path is based on best guess. Adjust it as needed.
See Quick Setup for information how to quickly configure the multiexport.
64.10. Flying
Follow the steps below to get a moving map and see your aircraft in Little Navmap:
Open the dialog
ConnectusingTools-> Flight Simulator Connection and
check if
and
check if Connect automaticallyis selected. Enable it if not. Little Navmap will find the simulator no matter if it is already started or will be started later.Click on the tab which corresponds to your simulator. Image below shows the tab for FSX, P3D or MSFS on the left and the tab for X-Plane on the right.
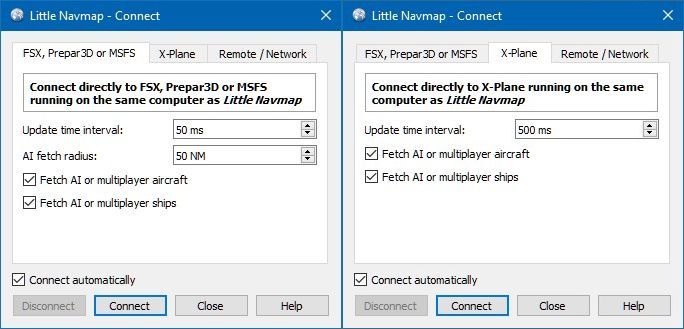
Click
Connectwhich will close the dialog.Enable
Map-> Keep User Aircraft Centered . The map will
jump to the simulator aircraft and keep it centered if an active flight
is loaded, i.e. the simulator is not in the opening screen.
. The map will
jump to the simulator aircraft and keep it centered if an active flight
is loaded, i.e. the simulator is not in the opening screen.Start the simulator if not already done, load the flight plan and go flying.
Important
Make sure you use the right build of Little Navmap.
The 64-bit version shows only MSFS in the connection tab while the 32-bit version shows FSX and P3D.
See also Connecting to a Flight Simulator.
64.11. Looking at Places while Flying
Little Navmap will keep your aircraft centered on the screen as a default setting. You can configure this function in the options dialog on page Simulator Aircraft.
The program will stop following your aircraft for 10 seconds if you start any action that zooms in to an airport or navaid (double-click, toolbar button or link in the information window) or just simply move or zoom around in the map.
See User Aircraft Centering for more information about aircraft centering while flying.
Double-click on the destination airport to zoom to the airport diagram, for example. Leave Little Navmap alone and the map will jump back to the aircraft and next flight plan waypoint after the timeout.