3. Installation
Little Navmap for Windows is available as a 64-bit or 32-bit application and was tested with Windows 10 and Windows 11. You can download either an installer package or a Zip-archive.
Apple macOS is supported from macOS High Sierra 10.13 or later. You need Rosetta to run Little Navmap on Apple Silicon / M1 computers with the exception of Little Xpconnect which is available as a native X-Plane plugin.
Linux versions built on recent Ubuntu releases are available and should work on other distributions as well.
Each version of Little Navmap and the other programs come with a plain text file CHANGELOG.txt
which has important notes and describes the changes between versions.
Warning
Do not install Little Navmap in the MSFS folder Community or in the X-Plane plugins folder.
Important
Apple macOS users: Keep in mind that you have to clear the quarantine flag for Little Xpconnect on update. See Clearing the Quarantine Flag on macOS.
3.1. Updating
Delete all installed files of a previous Little Navmap version before installing a new version or install into a new folder. All files from the previous ZIP archive can be deleted since settings are stored in separate directories.
Warning
In any case do not merge the installation directories since old files can cause problems.
There is no need to delete the old settings directory. The program is written in a way that it can work with old setting files and adapts these if needed. In some cases settings are reset to default if an updated version is installed.
See Files for more information about settings, database and cache files.
3.2. Windows
3.2.1. Builds
There are two builds of Little Navmap and Little Navconnect for Windows available:
Windows 64-bit: For MSFS and all X-Plane versions. Download file is
LittleNavmap-win64-2.8.2.zipfor example.Windows 32-bit: For FSX and Prepar3D. Download file is
LittleNavmap-win32-2.8.2.zipfor example.
You can see the Windows build type in About Little Navmap and in the Window Title (64-bit or 32-bit).
Note that Little Navmap and all related programs are inter-operable across the network (Little Navmap and Little Navconnect) as well as the X-Plane plugin (Little Navmap, Little Navconnect and Little Xpconnect).
Also both versions share the same settings and databases. You can switch from one version to another without problems.
3.2.2. Installer
You can use the self-installing package based on Inno Setup to install Little Navmap on your computer.
The installer packages are named LittleNavmap-...-Install.exe and contain the same programs and files as the Zip archives.
The installation process always installs the program for all users in a protected directory like C:\Programs.
You can manually select another directory but I recommend to leave the default location.
Both the 32-bit and the 64-bit versions can be installed in parallel.
There is no need to uninstall the program when updating. The installation process automatically detects the last selected directory and overwrites the current installation.
File types can optionally be associated with Little Navmap which allows to load a flight plan by double clicking on a LNMPLN file in Windows Explorer, for example. Little Navmap is either started or an already running instance is used to load the flight plan.
If both the 32-bit and the 64-bit versions are installed, the last installed version is associated to the file types. Change the association manually in Windows Explorer if needed.
Start menu entries for all included programs as well as the most important files and links are created.
Note
There is no need to install or modify any files in the installation folder for the webserver or map themes.
See Web Server for information how to change the root folder and Map Themes for information how to set the map theme folder and how to install additional map themes.
3.2.2.1. Uninstall
You can uninstall Little Navmap by right clicking on the icon in the Windows start menu and selecting Uninstall.
Alternatively uninstall Little Navmap from Windows settings or control panel.
The uninstaller asks to optionally delete all settings and databases created by Little Navmap after removing the main program.
Files in directories like Documents\Little Navmap are not deleted.
Warning
Note that this step also removes the userpoint database as well as the logbook and cannot be undone.
The two folders which can be deleted are:
Settings and databases:
C:\Users\YOURUSERNAME\AppData\Roaming\ABarthelOnline map cache:
C:\Users\YOURUSERNAME\AppData\Local\.marble\data\maps\earth
3.2.3. Manual Installation
The manual installation of Little Navmap does not change or create any registry entries in Windows and involves a simple Zip extraction of files.
Important
Do not extract the archive into the directory c:\Program Files\ or
c:\Program Files (x86)\ since this requires administrative
privileges. Windows keeps control of these directories, therefore other
problems might occur like replaced or deleted files.
There is no need to run Little Navmap as administrator. Adapt folder permissions if you have to export flight plans to protected places.
Extract the Zip archive into a directory like C:\Users\YOURNAME\Documents\Little Navmap or
C:\Users\YOURNAME\Programs\Little Navmap.
Then start the program by double-clicking littlenavmap.exe. The
extension .exe might be hidden in Windows Explorer depending on
settings. In that case look for a file littlenavmap having a light
blue globe icon  .
.
File types have to be manually associated to Little Navmap when using this installation method. Use Windows Explorer or another file manager used on your operating system to do this.
3.2.3.1. Uninstall
Simply remove the program folder. See Files for more settings, cache and database folders if you’d like to completely remove Little Navmap.
3.2.4. SimConnect
Little Navmap comes with a SimConnect library and does not require a separate installation of SimConnect.
3.2.5. Unblock Application
Depending on system and anti-virus settings it might be needed to unblock the executable files.
This applies to Little Navmap (littlenavmap.exe), Little Navconnect (littleconnect.exe) and the Little Xpconnect plugin (win.xpl).
You can do this in the Windows explorer by selecting properties and checking Unblock file.
Detailed instruction can be found here, for example:
How to Unblock a File in Windows 10.
3.2.6. Improve Start-up Time
Anti-virus programs can significantly slow down the startup and execution of the program on Windows.
Therefore, it is recommended to exclude the following directories from scanning:
Disk cache for map tiles:
C:\Users\YOURUSERNAME\AppData\Local\.marble\dataScenery library and userpoint databases
C:\Users\YOURUSERNAME\AppData\Roaming\ABarthel\little_navmap_db
These directories do not contain executable files and are accessed frequently by Little Navmap.
3.3. macOS
Extract the ZIP file and copy the Little Navmap application to the
directory Applications or any other directory.
Note
The menu entry which is referenced as Tools -> Options in this manual
for Windows and Linux
can be found in the application menu at Little Navmap -> Preferences on macOS.
3.3.1. First Start on macOS
Note on first start on macOS: When starting the application you will
get a message Little Navmap is from an unidentified developer. Are you sure you want to open it?.
The procedure may be slightly different depending on whether you’re using Big Sur or Catalina.
Right or Ctrl-Click in the Finder on Little Navmap and select
Open.You will see a dialog
Little Navmap cannot be opened because it is from an unidentified developer.ClickOk.Go to
System Preferences->Security and Privacy. You will see a message mentioning Little Navmap. ClickOpen Anyway.Next a dialog
Are you sure you want to open it?pops up. ClickOpen.
3.4. Linux
Extract the archive to any place and run the executable file
littlenavmap to start the program from a terminal:
./littlenavmap
Most file managers will start the program if double-clicked.
A desktop file Little Navmap.desktop is included.
You have to adjust the paths to use it. You must use absolute paths in the desktop file.
See the Little Navmap - Frequently asked Questions for help if the program does not start.
3.5. Additional Programs
The Little Navmap Zip archive contains two additional folders:
Little Navconnect: A complete copy of the program allowing remote
flight simulator connections for FSX, P3D, MSFS and X-Plane.
Little Xpconnect: This is the 64-bit plugin that is needed for
Little Navmap or Little Navconnect to connect to X-Plane. See Little Xpconnect for installation and usage.
3.6. X-Plane Plugin
Little Navmap can only connect to X-Plane using the Little Xpconnect X-Plane plugin which has to be installed as well.
The Little Xpconnect plugin is included in the Little Navmap archive. You can always find the correct and matching version in your Little Navmap installation directory.
See Little Xpconnect for installation and usage.
3.7. Portable Execution
Running Little Navmap in portable mode instructs the program to place all settings, databases and cached files into the installation directory (i.e. the directory containing the executable file). No folders or files are created on the computer running the program from a memory stick, for example.
You can also use the portable mode to test new Little Navmap releases without affecting your current settings.
Scripts allow to run Little Navmap in portable mode by passing certain command line options to the program:
Windows:
Little Navmap Portable.cmdmacOS:
Little Navmap Portable.commandLinux:
Little Navmap Portable.sh
Three folders are created when running these scripts: Little Navmap Cache for the online map image tiles,
Little Navmap Logs for log files and Little Navmap Settings used to store settings and databases.
See Command Line Options for more information.
3.8. Multiple Installations
Do not run more than one Little Navmap instances using the same settings folder in parallel. This can result in crashes when accessing the databases. Running several instances is prevented by the program on Windows but not on Linux and macOS.
You can instruct Little Navmap to create and use a different settings folder by passing the
parameter --settings-directory to the executable when starting up. This is supported for all operating systems.
This parameter instructs the program to use the given directory instead of ABarthel
and allows to have two instances of Little Navmap running with their own settings
and databases.
Note that this does not override the full path and spaces are replaced with underscores.
Example:
How to use C:\Users\YOURUSERNAME\AppData\Roaming\ABarthel-XP as a settings folder on Windows:
Right click on the
littlenavmap.exefile (extension might be hidden in Windows explorer) and selectCreate Shortcut.Right click on the newly created shortcut and edit the shortcut properties.
Append
--settings-directory ABarthel-XPto the path in the settings field separated by a space before--settings-directory.Click
Ok.
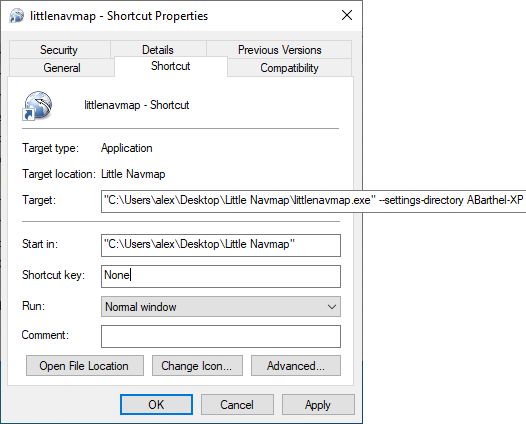
Contents of the link properties dialog for the example above. Extended target folder input field to have the whole path visible.