9. Main Menu and Toolbars
This chapter describes all the menu items of Little Navmap. You will find some of this functionality on the toolbars as well which are not be described separately. Keyboard shortcuts can be seen on the menu items. See Keyboard Shortcuts for a complete list.
All toolbar buttons have an equivalent function in the menu.
Drop down menus in the toolbar can be torn off by clicking on the dashed line on top of them. See Tear off Dropdown Menus for more information.

Menu and toolbars docked in default positions. Screenshot based on Little Navmap 2.6.
Tip
Look at the left side of this online user manual to see all the menus and menu items in a tree like structure.
9.1. File Menu
9.1.1.  New Flight Plan
Clears the current flight plan and shows the flight plan table.
You have to use Context Menu Search, Context Menu Map or Flight Plan Route Description dialog to create a new flight plan.
Note
You can exit Little Navmap without saving the current plan. All will be restored on next startup. See Load last used flight plan for more information and how to disable this behavior.
9.1.2.  Open Flight Plan
Opens a flight plan with one of the following formats:
LNMPLN. This is the default format of Little Navmap which supports all flight plan features like remarks. See Little Navmap LNMPLN Format for information about this format.
PLN: FSX, FS9, FSC or MSFS.
FLP
FMS: X-Plane FMS 11 (used by X-Plane 11 and X-Plane 12) or FMS 3
FlightGear FGFP
Garmin FPL and GFP
The file type is determined by content and not file extension. See Flight Plan Formats for more information.
An opened flight plan file will be reloaded on start up (reload and centering can be switched off
in the Options dialog on Startup and Update and User Interface).
You can also drag and drop files from a file manager like Windows Explorer or macOS Finder into the Little Navmap main window to load them. Single flight plan files of all allowed formats as well as aircraft performance files are accepted.
Note
Keep in mind that most flight plan formats are limited and not all information is provided or can be loaded from a file. For example, cruise altitude might not be loaded from X-Plane FMS in some cases, airways and departure parking spots cannot restored for several formats, transitions cannot be loaded from MSFS PLN and more.
Important
Always save a copy of the flight plan in LNMPLN format to be able to reload all information. Exporting to and reading from other formats like X-Plane FMS might result in information loss.
9.1.3.  Append Flight Plan
Adds departure, destination and all waypoints to the current flight plan.
Using Append Flight Plan allows to load or merge complete flight
plans or flight plan snippets into a new plan. All waypoints are added
at the end of the current flight plan. Then you can use the
Delete selected Legs and Move selected Legs up/down context menu
items to arrange the waypoints and airports as required. See Context Menu Flight Plan.
All current arrival procedures will be removed when appending a flight plan. The new flight plan will use arrival and approach procedures from the loaded plan, if any are present.
The appended legs are selected after loading the flight plan.
9.1.4. Recent Flight Plans
Shows all recently loaded flight plans for quick access. You can clear
the list by selecting Clear Menu.
Little Navmap will show an error message if you try to load a deleted file.
9.1.5.  Save Flight Plan
Saves the flight plan into the current LNMPLN file. This format allows to store all flight plan attributes of Little Navmap. Disabled if no flight plan has been loaded or created.
Little Navmap opens the Save as dialog (see below Save Flight Plan as LNMPLN) if departure,
destination or any other value used in the flight plan name has changed. This helps to avoid
overwriting LNMPLN files with wrong plans after reversing direction, for example.
You can disable this behavior in the options dialog on page Flight Plan by unchecking
Avoid overwriting Flight Plan with not matching departure and destination.
Note
Little Navmap will not ask to save the file on exit but will instead save the changes to a temporary file. The changes will be restored on next startup. See Load last used flight plan for more information and how to disable this behavior.
9.1.6.  Save Flight Plan as LNMPLN
Saves the flight plan to a LNMPLN file. This format allows to save all flight plan attributes of Little Navmap. Disabled if no flight plan has been loaded or created.
See Little Navmap LNMPLN Format for information about this format.
Save Flight Plan as PLN changes the current file name in
Little Navmap which means that all further saves will go into the new
LNMPLN file.
Little Navmap proposes a new file name based on the pattern set in options on page Flight Plan.
Tip
You can save the flight plan files in any place. I recommend a directory in Documents like
Documents\Little Navmap\Flight Plans.
You can also use the folder which is suggested by the dialog window Directories.
Important
Always save a copy of the flight plan in the default LNMPLN format to be able to reload all information. Writing to and reading from other formats like X-Plane FMS might result in information loss. See Flight Plan Formats for more information.
9.1.7.  Reset all for a new Flight
Opens a dialog which allows to reset functions in Little Navmap for a new flight. See Reset all for a new Flight for more information.
9.1.8. Export Flight Plan as MSFS 2020 PLN
Saves a flight plan for Microsoft Flight Simulator 2020. Disabled if no flight plan has been loaded or created.
Little Navmap can read and write this format.
This does not change the current file name and type. Further saves will still use the same LNMPLN file name and format as before.
The proposed file name can be defined in the Multiexport Options Dialog for format Microsoft Flight Simulator 2020.
See also Flight Plan Formats.
9.1.9. Export Flight Plan as P3D or FSX PLN
Saves a flight plan for FSX or Prepar3D. Disabled if no flight plan has been loaded or created.
Little Navmap can read and write this format.
This does not change the current file name and type. Further saves will still use the same LNMPLN file name and format as before.
The proposed file name can be defined in the Multiexport Options Dialog for format FSX and Prepar3D.
See also Flight Plan Formats.
9.1.10.  Export Flight Plan as FMS for X-Plane 11 and 12
Saves the flight plan using the new X-Plane FMS 11 format which is usable in X-Plane 11 and X-Plane 12. Disabled if no flight plan has been loaded or created.
Little Navmap can read and write this format.
See Flight Plan Formats for more information on limitations.
This does not change the current file name and type. Further saves will still use the same file name and format as before.
Store FMS files into the Output/FMS plans directory inside the
X-Plane directory if you would like to use the flight plan in the
X-Plane GPS, the G1000 or the FMS.
The proposed file name can be defined in the Multiexport Options Dialog for formats X-Plane 11.
Note that the two export format entries for X-Plane 11 and 12 use the same file format but a different folder.
9.1.11.  Export Flight Plan as FlightGear FGFP
Flightplan format which can be loaded into the RouteManager of the free flight simulator FlightGear. Disabled if no flight plan has been loaded or created.
Little Navmap can read and write this format.
See Flight Plan Formats for more information on limitations.
This does not change the current file name and type. Further saves will still use the same file name and format as before.
You can save the files into any directory and load it within FlightGear.
The proposed file name can be defined in the Multiexport Options Dialog for format FlightGear.
9.1.12. Open Flight Plan from SimBrief
Opens a dialog that allows to import a flight plan from SimBrief.
See Open Flight Plan from SimBrief for more information.
9.1.13. Export Flight Plan to SimBrief
Opens a dialog that allows to export a flight plan to SimBrief. Disabled if no flight plan has been loaded or created.
See Export Flight Plan to SimBrief for more information.
9.1.14. Show Flight Plan in SkyVector
Opens the default web browser and shows the current flight plan in SkyVector. Procedures are not shown. Disabled if no flight plan has been loaded or created.
Note that the flight plan will not be shown if a small airport is unknown to SkyVector.
Example: ESMS NEXI2B NILEN L617 ULMUG M609 TUTBI Z101 GUBAV STM7C ENBO. Note missing SID and STAR in SkyVector.
9.1.15. Export Flight Plan to Other Formats
9.1.15.1. Export Flight Plan as HTML Page
Saves the flight plan table as shown to HTML file which can be viewed in a web browser. Icons are embedded in the page. Disabled if no flight plan has been loaded or created.
The exported file will reflect changes of the flight plan table view like column order. Columns which are hidden or shrinked to minimum width are excluded.
9.1.15.2. Export Flight Plan as GPX
Exports the current flight plan into a GPS Exchange Format file which can be read by Google Earth and most other GIS applications. Disabled if no flight plan has been loaded or created.
The flight plan is exported as a route and the flown aircraft trail as a track including simulator time and altitude.
The route has departure and destination elevation and cruise altitude set for all waypoints. Waypoints of all procedures are included in the exported file. Note that the waypoints will not allow to reproduce all parts of a procedure like holds or procedure turns.
Note
Do not forget to clear the aircraft trail ( Delete User Aircraft Trail or Reset all for a new Flight) before a flight to avoid old trail segments in the exported GPX file. Or, disable the reloading of the trail in the options dialog on Startup and Update.
9.1.15.3. Export Flight Plan for vPilot, xPilot or SWIFT
Export the flight plan for the VATSIM vPilot online network client. Disabled if no flight plan has been loaded or created.
Flight Plan Online Network Export will appear before where you can add all needed information.
9.1.15.4. Export Flight Plan as IvAp FPL
9.1.15.5. Export Flight Plan as X-IvAp FPL
Export flight plan format for IVAO online network clients IvAp or X-IvAp. Disabled if no flight plan has been loaded or created.
Flight Plan Online Network Export will appear before where you can add all needed information.
9.1.16. Export Options
Sub-menu with several actions that affect export to most flight plan formats. This does not affect the saving of flight plans into the LNMPLN format.
Warning
Note that saving flight plans with one or more of these methods has limitations:
Several approach leg types like holds, turns and procedure turns cannot be displayed properly by using just waypoints or coordinates.
Speed and altitude limitations are not included in the exported legs.
Normally you should not use these export options.
9.1.16.1. Export Waypoints for Approaches
Save procedure waypoints instead of procedure information if checked. This affects all flight plan export formats except the native LNMPLN format.
Use this if your simulator, GPS or FMC does not support loading or display of approach procedures, SID or STAR.
Procedure information is replaced with respective waypoints that allow to display procedures in limited GPS or FMS units.
9.1.16.2. Export Waypoints for SID and STAR
As above Export Waypoints for Approaches but only for SID and STAR procedures.
9.1.16.3. Export Waypoints for Airways
Enabling this function will omit all airway information in the exported flight plan formats. A chain of waypoints will be exported instead of waypoint/airway/waypoint triplets.
9.1.17.  Multiexport Flight Plan
Exports all selected flight plan formats at once. You have to configure paths and select formats for exporting before by selecting Multiexport Flight Plan Options below. Also disabled if no flight plan has been loaded or created.
Disabled if no flight plan format is selected for export.
See Flight Plan Multiexport for details.
9.1.18.  Multiexport Flight Plan Options
Opens a dialog which allows to configure paths and select formats for flight plan exports with the Multiexport Flight Plan function above.
See Flight Plan Multiexport for details.
Note
Note that the multiexport dialog window is also used to define default file names for the export options Export Flight Plan as MSFS 2020 PLN, Export Flight Plan as P3D or FSX PLN, Export Flight Plan as FMS for X-Plane 11 and 12 and Export Flight Plan as FlightGear FGFP.
9.1.19.  Add Google Earth KML
Allows addition of one or more Google Earth KML or KMZ files to the map
display. All added KML or KMZ files will be reloaded on start up. Reload
and centering can be switched off in the Options dialog on
Startup and Update and User Interface.
Due to the variety of KML files it is not guaranteed that all files will show up properly on the map.
9.1.20.  Clear Google Earth KML from Map
Removes all loaded KML files from the map.
9.1.21.  Save Map as Image
Saves the current map view as an image file. Allowed formats are JPEG, PNG and BMP. The image does not include the map overlays.
Map Image Export will show up before saving which allows to select the image size.
9.1.22. Save Map as Image for AviTab
Saves the current map view as an image file for AviTab. Allowed formats are JPEG and PNG.
Map Image Export will show up before saving which allows to select the image size.
The saved file is accompanied by a calibration file in
JSON-Format. It
has the same name as the image with an additional .json extension.
The files have to be saved to
.../X-Plane 11/Resources/plugins/AviTab/MapTiles/Mercator.
See here in the AviTab documentation for more information how to load the map image: Map App - Mercator.
9.1.23. Copy Map Image to Clipboard
Copies the current map image to the clipboard. The image does not include the map overlays.
Map Image Export will show up before copying the image which allows to select the image size.
9.1.24.  Print Map
Allows to print the current map view. See Print Map for more information.
9.1.25.  Print Flight Plan
Opens a print dialog that allows you to select flight plan related information to be printed. See Print Flight Plan for more information.
9.1.26.  Quit
Quit
Exits the application. Will ask for confirmation if there are unsaved files.
9.2. Flight Plan Menu
9.2.1. Flight Plan
Opens and raises the flight planning dock window and flight plan tab.
Also activates the flight plan table for quick navigation. Same as
Window -> Shortcuts -> Flight Plan or pressing F7.
See Window for a full list or shortcuts.
9.2.2. Fuel Report
Opens and raises the flight planning dock window and Fuel Report tab.
Same as Window -> Shortcuts -> Fuel Report or pressing
F8.
See Window for a full list or shortcuts.
9.2.3.  Select a Start Position
Select a parking spot (airport center, gate, ramp, fuel box), a runway or a helipad as a start position at the departure airport. A parking position can also be selected in the map context menu item Set as Departure when right-clicking on the center of a parking position. If no position is selected the airport center is automatically selected as a start position.
See Select Start Position for more information.
9.2.4.  Select Departure Runway
Same as Set Departure Runway in the map context menu. Only active if the current flight plan has a departure airport. See more about this in chapter Departure and Destination Runway.
9.2.5.  Select Destination Runway
Same as Set Destination Runway in the map context menu. Only active if the current flight plan has a departure airport. See more about this in chapter Departure and Destination Runway.
9.2.6. 
 Undo and Redo
Allows undo and redo of flight plan changes. The last action is shown in the menu item like Add Waypoint, for example.
The undo information is cleared when restarting Little Navmap.
9.2.7.  Edit Flight Plan on Map
Toggles the flight plan drag and drop edit mode on the map. See Map Flight Plan Editing.
9.2.8.  Flight Plan Calculation
Opens the flight plan calculation dialog window which allows to automatically generate a flight plan by various criteria. The window is pulled into foreground if already open.
The altitude from the current flight plan is transferred to the calculation window but not vice versa.
See chapter Flight Plan Calculation for more information.
9.2.9.  Calculate Direct
Deletes all intermediate waypoints and connects departure and destination using a great circle line.
This function does not delete procedures from the current flight plan but will connect procedure exit and entry directly, if any.
Tip
You can calculate a flight plan between any kind of waypoints, even user defined waypoints (right-click on the map and select Add Position to Flight Plan to create one). This allows the creation of snippets that can be merged into flight plans.
9.2.10.  Reverse Flight Plan
Swaps departure and destination and reverses order of all intermediate waypoints. The departure airport will be assigned as start position.
Procedures are removed by this function.
This function also removes all airway references since the result would not be valid due to one-way restrictions.
9.2.11.  Adjust Flight Plan Altitude
Changes the flight plan altitude according to a simplified East/West rule and the current route type (IFR or VFR). Rounds the altitude up to the nearest even 1,000 ft (or meter) for westerly flight plans or odd 1,000 ft (or meter) for easterly flight plans. Adds 500 ft for VFR flight plans.
The rule can be changed in the options on page Flight Plan.
9.2.12.  Flight Plan Route Description
Opens a dialog with the ATS route description of the current flight plan that also allows to modify the current flight plan or enter a new one.
Flight Plan Route Description gives more information about this topic.
9.2.13.  Copy Flight Plan Route Description to the Clipboard
Copies the route description of the current flight plan to the clipboard using the current settings from Flight Plan Route Description.
9.2.14. Download Tracks on Startup
Downloads tracks immediately and instructs Little Navmap download tracks on startup.
See Tracks for more information.
9.2.15.  Download Tracks
Downloads Oceanic or other tracks which are NAT, PACOTS and AUSOTS.
Tracks are shown on the map and a message is shown in the Statusbar once the download is finished.
Tracks are removed when closing the program. Use the function Download Tracks on Startup
above to always have tracks available.
See Tracks for more information.
9.2.16. Delete Tracks
Remove downloaded Oceanic and other tracks from the track database.
9.2.17. Track Sources
9.2.17.1. NAT
9.2.17.2. PACOTS
9.2.17.3. AUSOTS
Allows to select the track systems to download. The download is triggered automatically after changing one of these options.
See Tracks for more information.
9.3. Map Menu
9.3.1.  Goto Home
Shows the home area that was set using Set Home View in the sub-menu More in the map context menu.
It will show the map using the saved position and zoom distance. The center of the home area is highlighted by a ![]() symbol.
symbol.
Note that the symbol is only an indicator for the home view center position and does not have any context menu or mouse actions attached.
The symbol cannot be hidden. Set it at a remote position if you like to hide it.
9.3.2.  Goto User Aircraft
Moves and zooms the map to the user aircraft. Disabled if not connected to a simulator.
9.3.3.  Center Flight Plan
Centers the whole flight plan on the map.
9.3.4.  Go to Center for Distance Search
Go to the center point used for distance searches. See Set Center for Distance Search.The
center for the distance search is highlighted by a ![]() symbol.
symbol.
The center symbol cannot be hidden. Set it at a remote position if you like to hide it.
9.3.5.  Jump to Coordinates
Opens a dialog allowing to place the map at the given coordinates at the given zoom distance.
See Jump to Coordinates about the dialog and Coordinate Formats about the accepted formats.
9.3.6.  Keep User Aircraft Centered
Zooms to the user aircraft if connected to a flight simulator or Little Navconnect and keeps the aircraft centered on the map.
See User Aircraft Centering for general information about aircraft centering while flying.
9.3.7.  Delete User Aircraft Trail
The global aircraft trail is saved and will be reloaded on program startup.
This menu item and toolbar button removes the user aircraft trail from both the map and the elevation profile.
The trail can be exported together with the flight plan into a GPX file by using Export Flight Plan as GPX.
While the global trail is independent of flights, an aircraft trail is also attached to logbook entries as a flown trail and can be stored there.
The logbook trail only covers the flight from takeoff to touchdown. See Logbook.
9.3.8. 
 Map Position Back/Forward
Jumps forward or backward in the map position history which is a result of all map movements or zoom actions. Movements from the user or the program (like aircraft centering) are recorded.
The complete history is saved and restored when starting Little Navmap.
9.3.9.  Remove all Highlights and Selections
Deselect all entries in the flight plan table, all search result tables and removes all highlight marks from the map. Also clears the procedure preview enabled with Preview all Procedures in the window Search Procedures.
Use this to get a clean view of the map while flying.
9.3.10.  Remove all Range Rings
9.3.11.  Remove all Measurement Lines
9.3.12.  Remove all Traffic Patterns
9.3.13.  Remove all Holdings
9.3.14.  Remove all MSA Diagrams
Removes the respective user features which are range rings, navaid range rings, measurement lines, airport traffic patterns, user placed MSA diagrams and user holdings from the map.
This cannot be undone.
A warning dialog is shown before removing the user features.
The options are disabled if the respective features are not present the map.
9.3.15.  More Details
9.3.16.  Default Details
9.3.17.  Less Details
Increases or decreases the detail level for the map. More details means more airports, more navaids, more text information and bigger icons.
Map details have an equivalent button ![]() on the toolbar which allows to change the
detail level with a slider. The drop down menu of the toolbar button can be torn off by clicking on the dashed line in the menu (Tear off Dropdown Menus).
on the toolbar which allows to change the
detail level with a slider. The drop down menu of the toolbar button can be torn off by clicking on the dashed line in the menu (Tear off Dropdown Menus).
The detail level is shown in the Statusbar. Range is -2 for least detail to +5 for most detail.
Warning
Map information will be truncated if too much detail is
chosen. A red warning message Too many objects will be shown in the Statusbar if this is
the case.
Tip
You can also quickly change the detail level with the mouse wheel using Ctrl+Wheel
or with the keyboard shortcuts Ctrl++, Ctrl+- or Ctrl+0 (default details).
9.4. View Menu
9.4.1. Reset Display Settings
Resets all map display settings which can be changed in the menu View back to default.
9.4.2. Airports
This sub-menu has an equivalent button ![]() on the toolbar containing the same items as
this sub-menu. The toolbar buttons additionally allows to limit the display of airports to a minimum runway length.
The drop down menu of the toolbar button can be torn off by clicking on the dashed line in the menu (Tear off Dropdown Menus).
on the toolbar containing the same items as
this sub-menu. The toolbar buttons additionally allows to limit the display of airports to a minimum runway length.
The drop down menu of the toolbar button can be torn off by clicking on the dashed line in the menu (Tear off Dropdown Menus).
Note that airports might be hidden on the map depending on zoom distance and airport type.
9.4.2.1.  Show Airports
Disable or enable the display of all airports. This also covers add-on airports.
9.4.2.2.  Reset airport display options
Reset airport display to default settings, i.e. display all airports.
9.4.2.3. Hard surface
Show airports that have at least one runway with a paved surface. Note that this affects the other map display airport filters as well.
9.4.2.4.  Soft surface
Show airports that have only unpaved runways. Note that this affects the other map display airport filters as well.
9.4.2.5.  Seaplane Bases
Show airports that have only water runways.
9.4.2.6.  Heliports
Show airports that have no runways but only helipads or are marked as a heliport.
9.4.2.7.  Empty
Empty
Show empty airports. This button or menu item might be disabled
depending on settings in the Options dialog on Map.
The status of this button is combined with the other airport
buttons. This means, for example: You have to enable soft surfaced
airport display and empty airports to see empty airports having only
soft runways.
An empty airport is defined as one which has neither parking nor taxiways nor aprons and is not an add-on. These airports are treated differently in Little Navmap. Empty airports are drawn gray and behind all other airports on the map.
This function helps the user to avoid airports that have no scenery elements.
Airports having only water runways are excluded from this definition to avoid unintentional hiding.
X-Plane and 3D airports
The function can be extended to X-Plane airports which are not marked as
3D. This can be done by checking
Consider all X-Plane airports not being 3D empty in the Options
dialog on page Map. All airports not being marked as
3D will be shown in gray on the map and can be hidden like described
above if enabled.
An airport is considered 3D if its source file contains 3D in the
gui_label.
The definition of 3D is arbitrary, though. A 3D airport may
contain just a single object, such as a light pole or a traffic cone or
it may be a fully constructed major airport.
9.4.2.8.  Not lighted
Show airports which have no lighted runway.
9.4.2.9.  No procedure
Show airports which have no approach or other procedures.
9.4.2.10.  Closed
Show airports which are marked closed or have only closed runways.
9.4.2.11.  Military
Show military airports. Note that military airports are detected by name patterns like AB and therefore not all military airports can be detected. This also applies to airports with both military and civil use.
9.4.2.12.  Add-on
Add-on airports are always shown independently of the other airport map settings and zoom level if this option is selected.
This means that the display of add-on airports will ignore all filters set in this menu, also the runway length.
Enabling this function allows to see even small add-on airstrips in continental zoom levels, for example.
Add-on airports are highlighted with a yellow ring which is independent of this function.
You can disable the yellow ring in the options dialog on page Map Display by unchecking Highlight add-on airports.
Example: Add-on on a higher zoom level:

Off: Only large add-on airports are shown on the map with a yellow highlight.
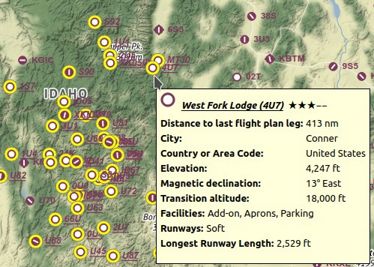
On: All large add-on airports and additionally small add-on airstrips are shown on the map with a yellow highlight.
9.4.3. Navaids
Show or hide these navaids on the map. Navaids might be hidden on the map depending on zoom distance.
Note
Navaids related or being part of a flight plan and its procedures are always shown together with the flight plan. You can disable the display of all VOR, NDB, waypoints and ILS to get a more clean display when flying.
9.4.3.1.  Show VOR Stations
Toggle display of VOR, VORDME, VORTAC, DME and TACAN stations.
9.4.3.2.  Show NDB Stations
Toggle display of NDB navaids.
9.4.3.3.  Show Waypoints
Show or hide intersections or waypoints.
9.4.3.4.  Show ILS Feathers
Toggles the display of ILS, localizer, IGS, LDA and SDF feathers.
Note that this setting also affects the ILS glideslope display in the elevation profile and can be used to force the display of the ILS slope for all approach types. See Show ILS or GLS/RNP for more information.
9.4.3.5.  Show GLS/RNP Approach Paths
Toggles the display feathers for GLS, RNP and other approach types.
Note that this setting also affects the GLS/RNP glidepath display in the elevation profile and can be used to force the display of a glidepath for all approach types. See Show ILS or GLS/RNP for more information.
Note
GLS/RNP approach paths are not available when using the setting Do not use Navigraph Database in the
menu Scenery Library -> Navigraph with FSX, P3D or MSFS. See also Load Scenery Library and Navigation Databases.
9.4.3.6.  Show Holdings
Show or hide en-route holdings. Note that these are a part of the navdata and do not cover user placed holdings which can be added from the map display context menu using Add Holding.
Note
En-route holdings are not available when using the setting Do not use Navigraph Database in the
menu Scenery Library -> Navigraph with FSX, P3D or MSFS. See also Load Scenery Library and Navigation Databases.
9.4.3.7.  Show MSA Sectors
Toggle display of MSA (minimum sector altitude) icons. This does not cover the user placed MSA sector diagrams.
See Minimum Sector Altitude for more information.
Note
MSA sectors are not available when using the setting Do not use Navigraph Database in the
menu Scenery Library -> Navigraph with FSX, P3D or MSFS. See also Load Scenery Library and Navigation Databases.
9.4.3.8.  Show Victor Airways
9.4.3.9.  Show Jet Airways
Toggle display of airways and the attached waypoints.
9.4.3.10.  Show Tracks
Show or hide Oceanic or other tracks which are NAT, PACOTS and AUSOTS.
This function is disabled if no tracks are downloaded.
See Tracks for more information.
9.4.4. Airspaces
This sub-menu and toolbar button allow the selection of individual airspace categories.
Airspace data sources can be selected in menu Scenery Library -> Airspace Libraries.
The dropdown menu of the toolbar buttons can be torn off (Tear off Dropdown Menus).
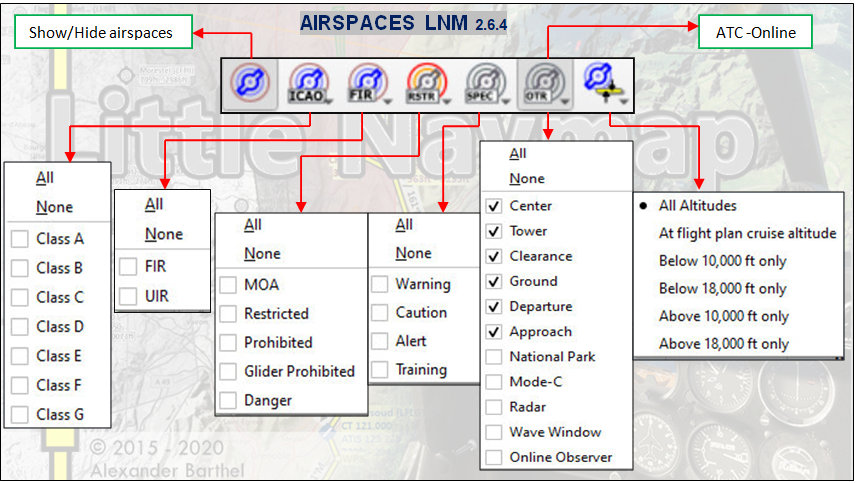
Airspace selection toolbar with all drop down menus. Click image to enlarge.
9.4.4.1.  Show Airspaces
Allows to enable or disable the display of all airspaces with one click. Use the menu items below this one or the toolbar buttons to display or hide the various airspace types.
The airspaces toolbar contains buttons each having a drop down menu that
allows to configure the airspace display like showing or hiding certain
airspace types. Each drop down menu also has All and None
entries to select or deselect all types in the menu.
The previous selection state is restored by clicking the All or None items a second time in
the toolbar button dropdown menu.
Additionally a minimum and maximum altitude can be selected in the toolbar button ![]() . Only airspaces
overlapping with these limits are shown.
. Only airspaces
overlapping with these limits are shown.
9.4.4.2.  ICAO Airspaces
Allows selection of Class A to Class E airspaces.
9.4.4.3.  FIR Airspaces
Allows selection of the Class F and Class G airspaces or flight information regions.
9.4.4.4.  Restricted Airspaces
Show or hide MOA (military operations area), restricted, prohibited and danger airspaces.
9.4.4.5.  Special Airspaces
Show or hide warning, alert and training airspaces.
9.4.4.6.  Other Airspaces
Show or hide center, tower, mode C and other airspaces.
9.4.4.7. All altitudes
Show airspaces for all altitudes.
9.4.4.8. At flight plan cruise altitude
Show only airspaces touching the flight plan cruise altitude (set in Cruise altitude).
9.4.4.9. For minimum and maximum altitude
Show only airspaces touching the altitude range set in the toolbar button ![]() .
.
9.4.5. User Features
The menu item has an equivalent button ![]() on the map options toolbar.
The dropdown menu of the toolbar button can be torn off (Tear off Dropdown Menus).
on the map options toolbar.
The dropdown menu of the toolbar button can be torn off (Tear off Dropdown Menus).
The previous selection state is restored by clicking the All User Features or No User Features items a second time in
the toolbar button dropdown menu.
9.4.5.1.  Range Rings
9.4.5.2.  Measurement Lines
9.4.5.3.  Traffic Patterns
9.4.5.4.  Holdings
9.4.5.5. MSA Diagrams
Hides or shows the respective user features.
The respective option is automatically enabled after a user feature is added to the map.
User features can also be toggled with the toolbar button ![]() .
.
The previous selection state is restored by clicking the All or None items a second time in
the toolbar button dropdown menu.
9.4.6. Userpoints
Allows to hide or show user defined waypoints by type.
The menu item Unknown Types shows or hides all types which do not belong to a known type.
The type Unknown ![]() shows or hides all userpoints which are exactly of type
shows or hides all userpoints which are exactly of type Unknown.
User features can also toggled with the toolbar button ![]() .
.
You can tear off the drop down menu from the toolbar by clicking on the dashed line on top of it.
The previous selection state is restored by clicking the All Userpoints or No Userpoints items a second time in
the toolbar button dropdown menu.
The respective type is automatically enabled after a userpoint is added to the map.
See Userpoints for more information on user defined waypoints.
9.4.7.  Show Flight Plan
Show or hide the flight plan. The flight plan is shown independently of the zoom distance.
Note that the flight plan is also hidden in the elevation profile if you switch it off here.
Related navaids for procedures are forced with the flight plan display. All navaids needed for procedures are still shown if you disable the display of VOR, NDB and waypoints. This helps to keep an uncluttered map display.
9.4.8.  Show Top of Climb and Top of Descent
Hides the climb and descent slopes as well as the top of climb and top of descent indicators when disabled. This affects the map and elevation profile display but not the altitude calculation in the fuel report or elevation profile.
9.4.9.  Show Missed Approaches
Show or hide the missed approaches of the current flight plan or the procedure preview (Preview and Highlights).
Note
This function changes the active flight plan leg sequencing: Sequencing the active leg will stop if the destination is reached and missed approaches are not displayed. Otherwise sequencing will continue with the missed approach and the simulator aircraft progress will show the remaining distance to the end of the missed approach instead.
9.4.10. Show User Aircraft
Shows the user aircraft and keeps it centered on the map if connected to the simulator. The user aircraft is always displayed regardless of the zoom distance.
The icon color and shape indicates the aircraft type and whether the aircraft is on ground (gray border on ground).
![]() User aircraft in flight.
User aircraft in flight.
A click on the user aircraft shows more information in the
Simulator Aircraft dock window.
More options to change the map behavior while flying can be found here Simulator Aircraft in options.
9.4.11.  Show User Aircraft Trail
Show the user aircraft trail. The trais is always displayed regardless of the zoom distance. It is saved and will be reloaded on program startup.
The trail can be deleted manually by selecting Map -> Delete User Aircraft Trail in the main menu.
The length of the trail is limited for performance reasons. If it exceeds the maximum length, the trail is truncated and the oldest segments are lost. The maximum number of points can be changed in options on page Simulator Aircraft.
The trail can be exported together with the flight plan into a GPX file by using Export Flight Plan as GPX.
Note that an additional trail is saved with logbook entries. See Logbook for more information.
9.4.12.  Show Selected Altitude Range Arc
Shows a distance arc that predicts reaching the selected autopilot altitude. This is shown for descent and climb.
The option Show Vertical Track in the elevation profile provides similar functionality.
The selected autopilot altitude value can be seen in Tab Progress when enabling Autopilot Selected in Aircraft Progress Display Options.
Note that some add-on aircraft do not provide a useful autopilot altitude and use the value for their own purposes.
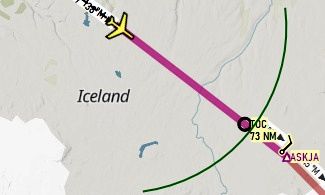
A jet aircraft climbing and about to reach the top of climb before waypoint ASKJA.
9.4.13.  Show Turn Flight Path
Enables a turn indicator which shows the predicted path if the given turn rate of the aircraft is kept. The arc is limited to 5 NM length and a turn maximum of 180°. Tick marks show distance in 1 NM steps.
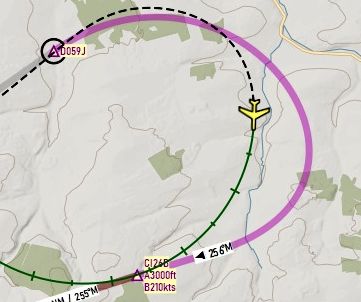
An aircraft turning in a procedure about to intecept the ILS after waypoint CI26B
9.4.14.  Show Aircraft Endurance
A dotted circle showing the maximum endurance is shown around the user aircraft if enabled. A label display endurance in NM and hours/minutes.
The label turns orange if the endurance is below 45 minutes and to red if endurance is below 30 minutes.
The endurance can be seen in Tab Progress when enabling Endurance in Aircraft Progress Display Options.
The endurance is based on fuel on board, current fuel flow and groundspeed considering reserves and contingency as set in the Aircraft Performance file. It is inly shown if the user aircraft is airborne. You will see limited endurance if climbing to cruise altitude since the range depends on the current fuel flow and speed.
Running below fuel reserves might also result in zero endurance shown even with fuel on board.
Note that you will see red or orange endurance warnings if the wrong aircraft performance file is used.
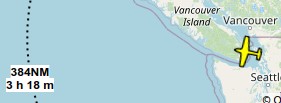
Aircraft endurance shown with label. 384 NM and 3 hours and 18 minutes to go.
9.4.15.  Show Compass Rose
Show a compass rose on the map which indicates true north and magnetic north. Aircraft heading and aircraft trail are shown if connected to a simulator.
The rose is centered around the user aircraft if connected to a simulator. Otherwise it is centered on the map view.
See Compass Rose for details.
9.4.16.  Attach Compass Rose to Aircraft
The compass rose is centered in the current view if not connected to a simulator.
Once connected, the compass rose will be attached to the user aircraft and follow its position.
This can be disabled with this menu item which detaches the rose from the user aircraft and keeps it centered on the screen.
9.4.17. AI and Online Aircraft
9.4.17.1.  Show AI and Multiplayer Aircraft
Shows AI and multiplayer aircraft on the map. Multiplayer vehicles can be displayed from e.g. FSCloud, VATSIM or Steam sessions.
The icon color and shape indicates the aircraft type and whether the aircraft is on ground (gray border).
Two types of traffic are shown:
- AI or multiplayer aircraft from the simulator:
 This includes aircraft traffic that is injected by
online network clients. A click on the AI aircraft or ship shows more
information in the
This includes aircraft traffic that is injected by
online network clients. A click on the AI aircraft or ship shows more
information in the Simulator Aircraftdock window in the tab Tab AI / Multiplayer.- Multiplayer aircraft/client from an online network:
 A click on the
online aircraft shows information in the
A click on the
online aircraft shows information in the Informationdock window in the separate tabOnline Clients. See also Online Networks.
The displayed vehicles are limited by the used multiplayer system if Little Navmap is not connected to an online network like VATSIM or IVAO. Multiplayer aircraft will disappear depending on distance to user aircraft.
Little Navmap limits the display of AI vehicles depending on size and type. Zoom close to see small aircraft or boats.
Aircraft labels are forced to show independently of zoom level for the next five AI/multiplayer aircraft closest to the user that are within 20 NM distance and 5,000 ft elevation. Other labels appear depending on zoom distance.
On the lowest zoom distance all aircraft and ships are drawn to scale on the map.
All aircraft icons can be customized: User, AI and Multiplayer Aircraft Icons.
Note
Currently MSFS multiplayer traffic cannot be shown. Have a look at the VirtualFlight.Online Transmitter to address this issue.
9.4.17.2.  Show Online Aircraft
As Show AI and Multiplayer Aircraft but shows online network aircraft on the map if enabled. This setting affects all traffic from online
networks like IVAO, VATSIM or custom networks which can be enabled in Options on page
Online Flying.
See Online Networks for an overview and Aircraft and Ships for information on aircraft colors and symbols.
9.4.17.3.  Show AI and Multiplayer Ships
As Show AI and Multiplayer Aircraft but enables or disabless AI or multiplayer ships on the
map. Fetch AI or multiplayer ships has to be enabled in the Connect Dialog to see AI ships.
This option also affects the frigate and carrier ships from X-Plane.
See also Aircraft and Ships for information on ship colors and symbols.
9.4.18.  Show Map Grid
Show a latitude/longitude grid as well as the Meridian and 180th Meridian or Antimeridian (near the date line) on the map.
A 30, 5 or 1 degree grid is shown depending on zoom distance.
9.4.19.  Show Map Grid Options
Shows a dialog window which allows to configure the map grid colors and labels.
9.4.20.  Show Country and City Names
Show country, city and other points of interest. Availability of these options depends on the selected map theme. See Map Themes and Map Layers for details.
9.4.21.  Show Minimum off-route Altitude Grid
Toggles the display of minimum off-route altitude grid on the map.
The minimum off-route altitude grid provides an obstacle clearance altitude within an one degree grid. The altitudes clear all terrain and obstructions by 1,000 ft in areas where the highest elevations are 5,000 ft MSL or lower. Where the highest elevations are above 5,000 ft MSL or higher terrain is cleared by 2,000 ft.
The large number is 1,000 ft and small number 100 ft minimum altitude.
Note
The MORA grid is not available when using the setting Do not use Navigraph Database in the
menu Scenery Library -> Navigraph with FSX, P3D or MSFS.
See also Load Scenery Library and Navigation Databases.
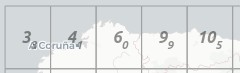
MORA grid: 3,300, 4,400, 6,000, 9,900 and 10,500 ft.
9.4.22.  Show Airport Weather
Shows icons for airport weather where a weather station is available. Select source for display with Airport Weather Source below.
See Airport Weather for an explanation of the symbols and Airport Weather for more information.
9.4.23. Wind levels
Enables or disables wind aloft display for different layers as well as at flight plan waypoints. Select wind data source for display with Wind source below.
See Winds Aloft for an explanation of the wind symbols and Winds Aloft for more information.
9.4.24.  Show Sun Shading
Enables the display of sun shading on the globe. This works in both
projections Mercator and Spherical.
You can change the time source with the Sun Shading Time menu below.
The shadow darkness can be changed in the dialog Options on page
Map Display User.
Note that offline maps cannot display a sun shadow.
See Sun Shading for more information.
9.4.25. Sun Shading Time
You can choose between three time sources for the sun shadow.
9.4.25.1. Simulator
Uses the time of the connected flight simulator and falls back to real time if not connected. Updates the shadow if the simulator time changes.
9.4.25.2. Real UTC Time
Use real time.
9.4.25.3. User defined Time
Allows to use the user defined time as set by using
Set User defined Time below.
9.4.25.4. Set User defined Time
Opens a dialog to set an user defined time in UTC as a source for the sun shading.
See Set User defined Time for more information.
9.4.26. Projection
See Map Projection for details.
9.4.27. Theme
See Map Themes and Map Layers for details.
9.5. Weather Menu
This sub-menu allows to change or enable weather source.
Note that some weather sources depend on the selected scenery library. For example:
X-Plane 11 scenery selected: X-Plane 11
METAR.rwxweather file andglobal_winds.gribwind file in the X-Plane 11 base path are loaded.X-Plane 12 scenery selected: The folder
Output/real weatherin the X-Plane 12 base bath is checked for METAR and wind files.
The same applies to ActiveSky weather files for X-Plane where the files are selected automatically. This does not apply to FSX, P3D and MSFS where the weather is loaded using the simulator connection.
See also on options page Weather Files for configuration of download addresses and file paths.
9.5.1. Airport Weather Source
Selects the source for the airport weather symbol display on the map. See also Airport Weather and Weather.
See Airport Weather for an explanation of the symbols
The following options are available:
9.5.1.1. Disabled
Disables the weather source which also disables all file accesses and online downloads. The menu item Show Airport Weather and the toolbar button will disabled if this is selected.
9.5.1.2. Flight Simulator
FSX, Prepar3D or X-Plane. Display for FSX/Prepar3D and on remote connections is slower and might cause stutters when scrolling.
Display for X-Plane remote connections is not supported except by
sharing the X-Plane 11 METAR.rwx weather file or the X-Plane 12 folder Output/real weather on the network.
9.5.1.3. Active Sky
Use Active Sky as source for weather display.
9.5.1.4. NOAA
Most up-to-date option for weather (National Oceanic and Atmospheric Administration).
9.5.1.5. VATSIM
Use this for online flying in the VATSIM network.
9.5.1.6. IVAO
Use this for online flying in the IVAO network.
9.5.2. Wind source
Choose the source for winds aloft forecast data here. This affects the calculation of top of descent, top of climb and fuel planning as well as display of wind barbs on the map. See also Winds Aloft and Weather.
A manual wind setting on Tab Fuel Report for cruise altitude can also be used. See
Buttons on tab Fuel Report.
The selected wind source is shown in the Tab Fuel Report in the
Average wind line as well as in all tooltips on wind barbs.
This is the same function as the Manual Wind menu button ![]() in the Tab Fuel Report.
in the Tab Fuel Report.
9.5.2.1. Manual Wind
This menu item allows to set the average wind direction and speed manually. Three input fields for direction, speed and level altitude are shown in the Tab Fuel Report if this is checked.
Note that the wind is set for given altitude and is interpolated down to zero for MSL. Placing a flight plan cruise level below the wind layer will result in lower winds. Placing the cruise level above will result in the same wind.
9.5.2.2. Disabled
No wind will be downloaded and processed and no files are checked for updates.
9.5.2.3. Flight Simulator (X-Plane only)
Uses the global_winds.grib file which is downloaded and used by
X-Plane 11 or checks the X-Plane 12 folder Output/real weather for changes. The files use less
wind layers and are therefore not as accurate and not as recent as the NOAA option.
Display for X-Plane remote connections is not supported except by
sharing the X-Plane 11 global_winds.grib weather file or the X-Plane 12 folder Output/real weather on the network.
9.5.2.4. NOAA
Downloads weather files from National Oceanic and Atmospheric Administration. This is the most accurate and most recent option since it downloads data for several wind layers as well as the ground level.
9.6. Userpoint Menu
See Userpoints for more information on user defined waypoints.
9.6.1. Userpoint Search
Raise the dock window Search and the tab Userpoints where you
can edit, add delete and search user-defined waypoints.
9.6.2. Undo and Redo Userpoint
Same as Undo and Redo Userpoint in the context menu of the userpoint table.
9.6.2.1. Cleanup Userpoints
Same as Cleanup Userpoints in the context menu of the userpoint table.
9.6.3. Import CSV
Import a CSV file that is compatible with the widely used format from Plan-G and adds all the content to the database.
Note that the CSV format is the only format which allows to write and read all supported data fields.
See CSV Data Format for a more detailed description.
9.6.4. Import X-Plane user_fix.dat
Import user defined waypoints from the file user_fix.dat. The file
does not exist by default in X-Plane and has to be created either
manually or by exporting from Little Navmap.
The default location is Custom Data/user_fix.dat in the X-Plane base folder.
The imported userpoints are of type Waypoint ![]() which can be
changed after import using the bulk edit functionality.
which can be
changed after import using the bulk edit functionality.
For additional information see X-Plane user_fix.dat Data Format.
9.6.5. Import Garmin GTN
Reads user defined waypoints from the Garmin user.wpt file. Refer to
the manual of the Garmin unit you are using for more information about
format and file location.
The imported userpoints are of type Waypoint ![]() which can be
changed after import using the bulk edit functionality.
which can be
changed after import using the bulk edit functionality.
See Garmin user.wpt Data Format for more information.
9.6.6. Export CSV
Create or append user defined waypoints to a CSV file. A dialog asks if only selected userpoints should be exported, if the userpoints should be appended to an already present file or if a header should be added.
Note that the exported file contains extra columns compared to the Plan-G format. The description field supports more than one line of text and special characters. Therefore, not all programs might be able to import this file. If needed, adapt the file in Microsoft Excel or LibreOffice Calc.
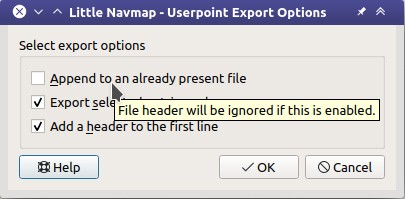
Userpoint export dialog with tooltip help on first option.
9.6.7. Export X-Plane user_fix.dat
Only selected userpoints or all can be exported. The exported data can optionally be appended to an already present file.
Not all data fields can be exported to this format. The ident field is required for export.
Also, you have to make sure that the user waypoint ident is unique
within the user_fix.dat.
See X-Plane user_fix.dat Data Format for more information about limitations.
9.6.8. Export Garmin GTN
Only selected userpoints or all can be exported. The exported data can optionally be appended to an already present file.
Not all data fields can be exported to this format. The ident field is required for export. Some fields like the name are adapted to limitations.
See X-Plane user_fix.dat Data Format for more information about limitations.
9.6.9. Export XML for FSX/P3D BGL Compiler
This export options creates an XML file which can be compiled into an BGL file containing waypoints.
The region and ident fields are required for this export option.
See the Prepar3D SDK documentation for information on how to compile the BGL and how to add this to the simulator.
9.7. Logbook Menu
9.7.1. Logbook Search
Raise the dock window Search and the tab Logbook where you can
edit, add delete and search logbook entries.
See Logbook for more information.
9.7.2. Undo and Redo Logbook Entry
Same as Undo and Redo Logbook Entry in the context menu of the logbook table.
9.7.3. Cleanup Logbook Entries
Same as Cleanup Logbook Entries in the context menu of the logbook table..
9.7.4. Show Statistics
Shows the logbook statistics dialog. See Logbook Statistics.
9.7.5. Import CSV
Import logbook entries from a CSV file. The entries are added to the logbook database.
9.7.6. Export CSV
Allows to export the full logbook or the selected entries to a CSV (comma separated value) text file which can be loaded in LibreOffice Calc or Microsoft Excel. See Import and Export.
9.7.7. Import X-Plane Logbook
Import the X-Plane logbook file
.../X-Plane 11/Output/logbooks/X-Plane Pilot.txt into the Little
Navmap logbook database. Note that the X-Plane logbook format is
limited and does not provide enough information to fill all Little
Navmap logbook fields.
See X-Plane Import.
9.7.8. Convert Log Entries from Userpoints
Automatically converts all legacy log entries that were collected as userpoints and copies them to the new logbook.
9.7.9. Create Logbook entries
Enables automatic logbook entry creation for takeoff and landing.
See also Create Logbook Entries.
9.8. Aircraft Menu
This menu contains functionality for aircraft performance profiles which allow fuel planning and traveling time estimation.
See Aircraft Performance and Aircraft Performance Edit for more information.
9.8.1.  New Aircraft Performance
Creates a new performance profile with default values, shows the fuel report and opens the edit dialog. A simple default profile for a Cessna C172 is default.
9.8.2.  Open Aircraft Performance
Loads a LNMPERF aircraft performance profile and shows the fuel report. You can also load a profile by dragging the file from a file manager like Windows Explorer into the main window of Little Navmap.
9.8.3.  Save Aircraft Performance
Saves the current profile. Opens a file dialog if not saved before.
9.8.4.  Save Aircraft Performance as
Allows to save the current profile using a new filename.
9.8.5. Recent Performance Files
Shows all recently loaded aircraft performance files for quick access.
You can clear the list by selecting the sub-menu item Clear Menu.
9.8.6.  Edit Aircraft Performance
Opens Aircraft Performance Edit for the current performance profile.
9.8.7. Open Aircraft Performance and Merge
Opens a file loading dialog and subsequently Aircraft Performance Merge which allows to merge or copy data from the opened file to the current aircraft performance.
9.8.8.  Merge collected Aircraft Performance
Opens Aircraft Performance Merge which allows to merge or copy data from the collected aircraft performance to the currently loaded aircraft performance.
See also Aircraft Performance Collection.
9.8.9.  Restart Aircraft Performance Collection
Resets all collected values for aircraft performance to zero and starts the performance collection over.
See also Aircraft Performance Collection.
9.8.10. Warning for Aircraft Type Mismatch
A warning in the fuel report and the flight plan table footer will be shown if this is enabled and the simulator aircraft type does not match the loaded performance file.
See Aircraft Type for more information on changing the type in the aircraft performance edit dialog window.
Note
Note that MSFS delivers wrong values for the ICAO designator through the SimConnect interface. Keep this warning disabled if you use MSFS.
9.9. Scenery Library Menu
See Navigation Databases for general information about navigation and simulator data.
9.9.1. Flight Simulators
One menu item is created for each flight simulator installation or database found. These menu items allow switching of databases on the fly.
The menu shows the simulator name as a disabled menu item as an indicator if only one flight simulator was found.
Note
The selection in the scenery library menus also affects the selection of weather files for ActiveSky and X-Plane.
The loaded AIRAC cycle is only shown for X-Plane and Navigraph data since the information is not available for FSX, P3D and MSFS.
The menu items are suffixed with the following depending on status:
prev. version - reload advised: The found database was created with a previous version of Little Navmap and should be reloaded to benefit from bug fixes or improvements.99 days old - reload advised: The scenery library database was loaded 99 days ago. Scenery changes in the simulator are very likely (installed add-on airports, simulator updates and more) and might not be reflected in the database.no simulator: A scenery library database was found but no related simulator installation. This database cannot be loaded but can be updated by manual copying from another computer, for example. This will be shown for a Network Setup where the simulator is not available on the remote computer. See Databases for file locations if you wish to remove a database.
This menu is synchronized with simulator selection in Load Scenery Library. Once a database is successfully loaded, the display, flight plan and search will switch over to the newly loaded simulator data.
Important
Little Navmap does not keep you from using a X-Plane scenery database while being connected to FSX/Prepar3D/MSFS or vice versa, for example. You will get unwanted effects like wrong weather information if using such a setup.
An orange warning message is shown in the connect dialog ( Connecting to a Flight Simulator) if a mismatch is detected.
Some functions like access to weather source files depend on the selected scenery library database. X-Plane 11 weather files are read if enabled and the X-Plane 11 scenery library is selected, for example.
Note
The program might change a loaded flight plan if you switch between
different databases. This can happen if a departure position is set in
the plan which does not exist in the other database. Select
New Flight Plan in the menu File before switching to avoid this.
9.9.3. Airspace Libraries
Enables or disables various airspace databases for display.
9.9.3.1. Simulator
Toggles display of simulator airspaces. These also change when changing
the simulator database in the Scenery Library menu.
See also X-Plane Airspaces and FSX, Prepar3D and MSFS Airspaces.
9.9.3.2. Navigraph
Shows the airspaces from the included or updated Navigraph database. This is independent of the selected simulator.
9.9.3.3. User
Selects user airspaces for display. This source is independent of the selected simulator.
See also Loading Airspaces and Load User Airspaces.
9.9.3.4. Online
Selects the online centers for display. Only enabled if connected to an online service like VATSIM or IVAO.
9.9.4.  Load User Airspaces
Shows a dialog window where user airspaces can be loaded.
See Loading Airspaces for information about loading airspaces into the Little Navmap database and Airspace Libraries for information how to select airspace sources to display.
9.9.5.  Validate Scenery Library Settings
Tests if the currently selected scenery library selection corresponds to the recommended modes. Shows a dialog window describing the recommended selection if changes are required.
See the chapter Navigation Databases and Load Scenery Library for more information.
9.9.6.  Load Scenery Library
Open the Load Scenery Library dialog which loads all files from a simulator scenery library like navaids, airports and more into an internal database. See Load Scenery Library for more information.
9.10. Tools Menu
9.10.1.  Flight Simulator Connection
Opens the Connect dialog allowing Little Navmap to connect directly
to a flight simulator, the Little Xpconnect X-Plane plugin, or
remotely using the Little Navconnect agent.
See Connecting to a Flight Simulator for more
information.
9.10.2. Toggle Flight Simulator Connection
Switches the simulator connection on and off without opening the connection dialog.
9.10.3. Run Webserver
Starts the internal web server of Little Navmap. Access the web page
using the menu item Open Webserver Page in Browser below.
See Web Server for detailed information and Web Server for configuration options.
9.10.4. Open Webserver Page in Browser
Only enabled if the web server is running. Opens the web server page in
your default browser. The default address is like
http://YOUR_COMPUTER_NAME:8965 or http://localhost:8965.
This function might not work depending on your network setup. Enter the computer name as above manually in your browser if this is the case.
9.10.5. Reset all Messages
Re-enable all dialogs that were disabled by selecting
Do not show this dialog again or similar messages.
All warning and note dialogs will show up again after selecting this. Hide them again manually by
selecting the Do not show this dialog again buttons.
9.10.6. Reset all Settings and Restart
This will reset all options, window layout, dialog layout, aircraft trail, map position history and file histories back to default values and restart Little Navmap after showing a warning dialog.
User features like range rings, traffic patterns, holds as well as scenery, logbook and userpoint databases are not affected.
A backup copy of the settings file little_navmap.ini is created in
the configuration directory. See Configuration.
Use this function instead of deleting the settings directory if you see crashes or other issues with the program.
9.10.7. Save Options and Application State
Saves all options, dialog settings, tab arrangements and the window layout. This is normally only done when exiting Little Navmap.
9.10.8. Create Directory Structure
Little Navmap creates a recommended directory structure when selecting this menu item.
See Directories for more information.
Note that Little Navmap does not require a fixed directory structure for its files. You can always save and load all files to and from arbitrary places.
9.10.9. Files and Directories
9.10.9.1. Open Log File
Shows the log file abarthel-little_navmap.log in the default text editor.
This can be used to track down errors or crashes.
See also Logs for details.
Note
This file combined with Open Configuration File below is the best way to report an issue.
Immediately save this log to another file if you’d like to report problems with Little Navmap. The log file might be overwritten if you continue your flight. See How to report a Bug for more information about reporting bugs.
9.10.9.2. Open Configuration File
Shows the main little_navmap.ini configuration file in the default text editor.
See also Configuration for details about the used files.
Warning
There is usually no need to edit this file directly. Editing this file the wrong way might crash Little Navmap.
9.10.9.3. Show Database Files
Open Little Navmap’s database directory in a file manager. See Running without Flight Simulator Installation for more information on copying database files between different computers.
See also Databases for details about the different database files.
9.10.9.4. Show Map Cache
Opens the file manager with the disk cache directory that is used to store all the downloaded online map tile images.
See also Disk Cache for details.
9.10.9.5. Show Map Installation Directory
Opens the file manager with the installation directory for additional map themss.
See also Installing Map Themes for more information about additional map themes.
9.10.10.  Flight Plan Table Display Options
9.10.11. Aircraft Progress Display Options
9.10.12. Elevation Profile Display Options
See also Elevation Profile Display Options.
9.10.13.  Options
Opens the dialog window Options which allows to change the user interface, map display, weather and more.
Note
The menu entry which is referenced as Tools -> Options in this manual
for Windows and Linux
can be found in the application menu at Little Navmap -> Preferences on macOS.
9.11. Window Menu
9.11.1. Shortcuts
A list of menu items that open and raise the respective dock window and tab. See Window shortcuts for a full list.
Some shortcuts also activate search fields or tables like the airport
ICAO search when using Airport Search or pressing F4. This
allows to quickly look for an airport or other feature by just pressing
a function key and entering the ICAO code.
9.11.2. Map Overlays
Show or hide floating map overlays, like the overview on the top left or the compass on the top right corner of the map window.
You can also right click on a map overlay to hide it from the context menu.
9.11.3. Style
Allows to switch the style of the graphical user interface on the fly. A restart is not needed.
The user interface styles contain a mode Night which can be used for
flights in a dark environment. You can also dim the map and elevation
profile display for this style in the dialog Options on
Map Display User (Map Dimming in Night Style at the bottom of the dialog).
The colors for the styles Fusion and Night can be changed by
editing configuration files. See Customizing General for more
information.
The available styles depend on the operating system except for
Fusion and Night which are always available.
9.11.4. Open Window Layout
Opens a LNMLAYOUT file and applies the changes like visibility, position and floating status directly to the dock windows. Size and position of the main window is also restored.
Full screen and normal layouts are both loaded from this file.
See Window Layout for more information.
9.11.5. Save Window Layout as
Saves visibility, position and floating status of all dock windows as well as the size and position of the main window to a LNMLAYOUT file.
Note that the layout for the fullscreen and normal view are save together in this file.
See Window Layout for more information.
9.11.6. Recent Window Layouts
List of recently saved or loaded window layout files. Select one to load and apply the layout.
9.11.7. Reset Window Layout
Reset the main window layout back to default. This involves visibility, position and state of all dock windows as well as the Toolbars and the Statusbar. Tabs are not affected by this.
This function can be helpful if a dock window gets lost on multi monitor setups or other issues.
Note that the dock windows Search and Simulator Aircraft are stacked in the default layout.
You can access both using the tabs at the lower right position of the main window.
See Window Layout for more information on window layouts.
9.11.8. Reset Tabs to Default
Resets all tabs to default. Opens all closed tabs, unlocks the tab layout and restores the default order.
This is the same as clicking Reset Tab Layout in each tab context menu.
See Tabs for more information on tabs.
9.11.9.  Fullscreen Map
Maximizes the map window and hides all dock windows as well as the toolbars.
See Fullscreen for more information on fullscreen mode.
9.11.10. Keep in Foreground
Forces the main window of Little Navmap to remain in foreground of all other applications.
9.11.11. Show all floating Windows
Raises all undocked (i.e. floating) windows before the main window. This can be helpful if a window got lost. See Dock Windows for more information about floating dock windows.
9.11.12. Allow Window docking
This is enabled per default. Disable this if you do not want floating (i.e. undocked) dock windows to snap back into the main window while moving them around. See also Dock Windows.
9.11.13. Allow Dock Window moving
Enabled per default. Disable this to avoid moving dock windows around when accidentally clicking and dragging the title bar which can mess up the window layout. Disabling this function still allows to move floating (i.e. undocked) windows around.
You can still resize the docked windows at the border between them and you can still turn a docked window into a floating window by double clicking on the title bar. See also Dock Windows.
9.11.14. Show Dock Window Title Bars
Hides the title bars of all docked (i.e. not floating) windows to save screen space if not checked. You can still resize the docked windows at their borders but you cannot drag them around. Dock windows can still be opened from the toolbar or using keyboard shortcuts.
Enable this if you’d like to undock windows or drag them around. See Dock Windows for more information.
9.11.15.  Search
9.11.16.  Flight Planning
9.11.17.  Information
9.11.18.  Flight Plan Elevation Profile
9.11.19.  Simulator Aircraft
Open or close these dock windows. The map dock window cannot be closed. The whole dock window stack is closed if a dock window is part of a stack. See Dock Windows for more information about stacked dock windows.
Note that the Flight Plan Calculation window cannot be docked and remains in floating state.
The altitude from the current flight plan is not copied to the calculation window when using this function.
9.11.20. File Toolbar
9.11.21. Map Toolbar
9.11.22. Map Options Toolbar
9.11.23. Flight Plan Toolbar
9.11.24. Map Airspaces Toolbar
9.11.25. Dock Window Toolbar
9.11.26. Tools Toolbar
Show or hide these Toolbars.
You can also hide toolbars in the context menu that appears when right clicking on them.
9.11.27. Statusbar
Show or hide the statusbar. See Statusbar for more on the shown information.
9.12. Help Menu
9.12.1.  User Manual (Online)
Show the online user manual in the default web browser. The English user manual is shown if it is not available in your language.
You can install additional language packs for Little Navmap which can include a translated manual.
9.12.2. User Manual - Tutorials (Online)
Shows the online tutorials in the default web browser.
9.12.3. User Manual - NavMap Legend (Online)
Show the navigation related map legend in the defaul web browser.
9.12.4. User Manual (Offline, PDF)
Show the included PDF user manual in the default PDF viewer.
You can install additional language packs for Little Navmap which can include a translated PDF manual.
9.12.5. Frequently asked Questions (Online)
Shows the page Little Navmap - Frequently asked Questions in the web browser. Look at these first if you have a question or problem.
9.12.6. Downloads (Online)
Opens the page Little Navmap Downloads in the default web browser where you can get aircraft performance files, airspace boundaries, flight plans, map themes or userpoints provided by the community.
9.12.7. Changelog
Opens the included file CHANGELOG.txt in a text editor. This file lists all changes made for each release. Refer to this file if you think that a function is missing or has been moved.
9.12.8.  About Little Navmap
Show version and revision number for Little Navmap, also contains links to the database directory, configuration file, log file and the author’s contact address.
9.12.9.  About Marble
Display information about the Marble widget that is used to download and show the maps.
9.12.10.  About Qt
Display information about the Qt application framework that is used by Little Navmap.
9.12.11.  Donate for this Program
Opens the donation web page in your default browser.
If you would like to show your appreciation you can donate using PayPal.
Donations are purely optional but greatly appreciated.

9.12.12.  Check for Updates
Allows to manually check for updates. This will also show updates that
were recently ignored by pressing the Ignore this Update on the
notification dialog.
See Updates for more information.