12. Map Display
12.1. Map Layers
Little Navmap uses two layers to display the map.
12.1.1. Background Map Layer
This is defined by offline or online map themes like the OpenStreetMap. You can change the background by selecting another Theme. The background maps cannot be modified or configured since they are fetched from third party online services. Little Navmap downloads pre-rendered image tiles from these services to draw the background map.
See Map Themes for more information about how to install additional map themes.
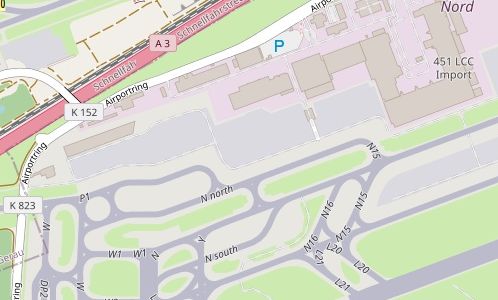
The OpenStreetMap background map showing aprons and taxiways of EDDF. These might not reflect what you see in the simulator and are not taken from your scenery library including add-on airports. You can see the same here on the OpenStreetMap web page which delivers the background map tiles for Little Navmap.
12.1.2. Foreground Map Layer
The foreground layer which is drawn by Little Navmap and can be customized in the options dialog on the map pages. It consists of airports, navaids, airways, airspaces, userpoints, measurement lines, range rings, holds, traffic patterns, MSA diagrams and all moving objects like AI and the user aircraft. This layer reflects airports as stored in the scenery library of your simulator. This applies to stock and add-on airports.
Only this layer provides the objects which enable tooltips and the functionality of the context menus to build a flight plan.
Aprons, taxiways and runways drawn by Little Navmap. These reflect your simulator stock or add-on scenery. Tooltips are available. Airport features can be disabled on options page Map Display Labels. See Legend for details about the various symbols shown by the map.
12.2. Moving
See Mouse Clicks and Key Commands in the map legend for information about how to move around the map using the mouse or keyboard.
Note
Do not forget to activate the map window by clicking into it or pressing
F2 before using keys for movement.
12.3. Mouse Clicks
A single click shows details about all map objects at the clicked
position in the Information dock window. Windows and tabs are raised
depending on clicked objects.
The procedure search window can be raised optionally if clicking an airport.
This can be enabled in the options dialog on page Map. Check Show procedures on airport
click to enable this function.
A single click on an user aircraft, AI aircraft or multiplayer aircraft
shows details in the Simulator Aircraft dock window.
A double-click zooms in showing either the airport diagram or the navaid
closely and also shows details in the Information dock window. The
same applies for all AI or multiplayer aircraft or ships.
The double-click and single-click functionality does not work for flight
plan waypoints or airports if the flight plan edit mode is enabled. The
edit mode can be disabled using the toolbar or Flight Plan ->
Edit Flight Plan on Map in the main menu. See also Map Flight Plan Editing.
The mouse click sensitivity can be adjusted in the Options dialog on
the page Map Navigation.
Note
The center of the airport symbol is the hotspot for right or left click actions as well as for tooltip display. This is also the case if the whole airport diagram is visible.
The same applies to all navaids as well as airport parking spots where the center is the hotspot for clicks.
12.4. Mouse Click Hotspots
Map marks like range rings or measurement lines have hotspots to indicate that a modifier-click
like Ctrl+Click can remove them or an action is available in the context menu. The same applies
to the flight plan drag and drop editing mode.
The mouse cursor changes into a hand  to indicate a click
spot.
to indicate a click
spot.
Click spots and hotspots for tooltips are:
Center of all airport, airport parking and navaid symbols.
Navaids for the procedure preview (Preview and Highlights).
Center of range rings (small circle).
Center of MSA diagrams (small circle).
Start and end of a measurement line (circle and cross).
Runway threshold point (small circle) for airport traffic patterns.
Holding fix (small triangle) of a user holding.
12.5. Mouse Clicks and Modifiers
You can use the keyboard and mouse clicks to get quick access to some functions.
See Mouse Clicks in the map legend for more information about this.
Clicking again on a hotspot removes the mark, measurement line or flight plan waypoint, for example.
12.6. Aircraft
The user aircraft and AI or multiplayer aircraft or ships will be shown on the map if the program is connected to a flight simulator. Color indicates user or AI or multiplayer vehicle and the symbol shape indicates if the aircraft is an piston/turboprop, jet, helicopter or a ship. The symbol outline changes to gray if an aircraft is on ground.
Note that not all simulators and online networks provide enough information to show the correct aircraft shape.
Little Navmap limits the display of AI vehicles depending on size. Zoom close to see small aircraft or boats
AI and multiplayer aircraft on ground are shown only on small zoom distances to avoid cluttered airports. This means that an AI aircraft can disappear from the map when landing on an airport.
Labels are shown depending on zoom level and distance to user aircraft as well. Zooming out drops the less important aircraft labels, for example. Flight number and registration are always shown.
A yellow wind arrow and labels for the situation around the user
aircraft can be displayed on the top center of the map. The displayed
labels for aircraft can be configured in the dialog Options on
Map Display Labels. No labels are shown for ship traffic.
See Aircraft and Ships for details about the aircraft type.
Tip
On the lowest zoom distance all aircraft are drawn to scale as are the parking spots which means you can easily check if your aircraft fits on an apron, parking spot or taxiway.
12.7. Tooltips
Hovering the mouse over the map will show tooltips for all map objects
including airports, VOR, NDB, airways, parking, fuel box, towers,
aircraft and ships. The tooltip is truncated and shows a message
More ... if it gets too long. In that case reduce details or zoom in
closer. Disable Verbose tooltips in options on page Map if you do not like the large tips.
The sensitivity for the tooltip display can be adjusted in the
Options dialog on Map Navigation.
You can select which tooltips to show in options on page Map.
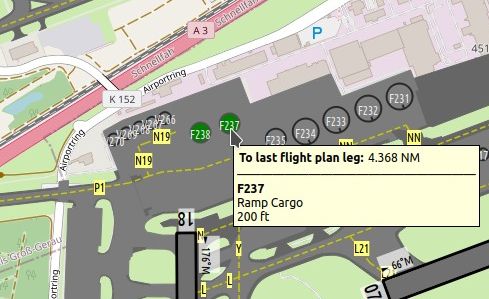
Tooltip with information for an airport and a VOR. Click image to enlarge.

Tooltip with information about airspaces. Click image to enlarge.
12.8. Highlights
Airports, navaids or other features that are selected in the flight plan table or in a search result table are highlighted on the map with a green/black or a yellow/black ring respectively (colors at default settings).
Waypoints that are selected in the procedure preview are highlighted with a blue/black ring using default colors.
These highlight circles provide all functionality of visible map objects, even if the objects are not shown at the current zoom distance (ring is empty). This allows double-click for zoom in, single-click for information dock window and all context menu entries.
You can use Map -> Remove all Highlights and Selections to remove all
highlights from the map.
Colors and appearance can be customized in options on page Map Display User.
12.9. Flight Plan
You can enable or disable the display of the flight plan as well as missed approaches in the menu and toolbar.
All features which are part of the flight plan are forced to be shown even if they are disabled in the menu. This means that destination, departure and alternate airport symbols as well as diagrams are shown even if airport display is disabled. The same applies to all navaids and approach ILS.
Colors and appearance of the flight plan can be customized in options on page Map Display Flight Plan. Labels can be changed on options page Map Display Labels.
Tip
Hide all map features to get a clean view on flight plan related airports and navaids only. This will hide all unneeded map objects but keeps all navaids and related navaids for procedures like ILS for the approach on the map.
12.10. Airport Diagram
The display will change from a single icon to an airport diagram if you zoom in deep enough to an airport. The diagram shows all taxiways, parking positions, gates, runways and more.
The airport diagram provides more information through tooltips at the center of parking and tower positions. A right-click on a parking position opens the context menu and allows to select the start position for flight plan departure.
See Airport Diagram for details about the airport diagram.
Airport labels and diagram features can be changed on options page Map Display Labels. Disable all airport features except runways if you’d like to rely on the airport diagrams of the OpenStreetMap background map, for example.
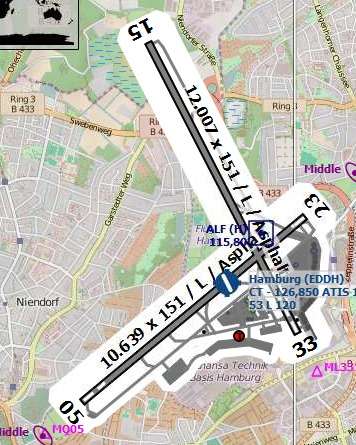
High level view of the airport diagram of EDDH. Click image to enlarge.
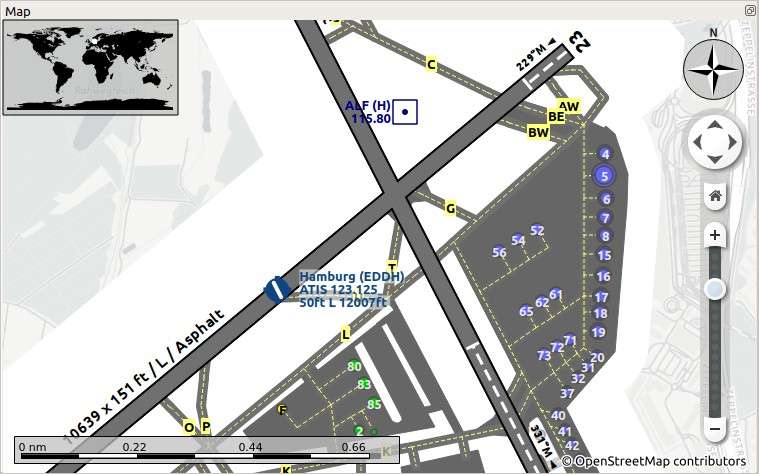
Detailed view of the airport diagram. Shows blue gates on the right and green general aviation ramp parking spots on the left. Long displaced threshold of runway 33 is visible. Dashed yellow lines indicate taxi paths. Click image to enlarge.
12.11.  Map Projection
The map projection can also be changed in the main menu View -> Projection or with the toolbar button ![]() .
Note that the drop down menu of the toolbar button can be torn off by clicking on the dashed line in the menu (Tear off Dropdown Menus).
.
Note that the drop down menu of the toolbar button can be torn off by clicking on the dashed line in the menu (Tear off Dropdown Menus).
Two projections can be selected in Little Navmap:
- Mercator
A flat projection that gives the most fluid movement and the sharpest map when using picture tile based online maps themes like OpenStreetMap or OpenTopoMap.
Note that this projection cannot be used near the poles. Use the spherical projection if you fly in Antarctica, for example.
- Spherical
Shows earth as a globe which is the most natural projection. Movement can stutter slightly when using the picture tile based online maps themes like OpenStreetMap or OpenTopoMap. Use the
Simple,PlainorAtlasmap themes to prevent this.Online maps can appear slightly blurred when using this projection. This is a result from converting the flat image tiles to the spherical display.
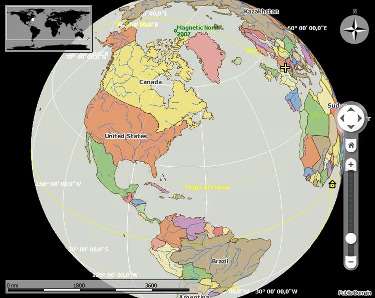
Spherical map projection with Simple offline map theme selected.
12.12. Map Themes
The map theme can be changed in main menu View -> Theme or with the toolbar button ![]() which can be torn off by
clicking on the dashed line in the menu (Tear off Dropdown Menus).
which can be torn off by
clicking on the dashed line in the menu (Tear off Dropdown Menus).
This allows to change the map theme which defines the look and feel of the background map (Map Layers).
See Map Display Keys for more information on themes requiring a login or an account. Map Themes explains how to create your own themes and how to install additional themes.
Tip
Also check out the Little Navmap Support Forum at AVSIM, Little Navmap Downloads - Map Themes and LittleNavmapOFMTheme for more map themes.
Note
Please note that all the online maps are delivered from free services therefore fast download speeds and high availability cannot be guaranteed.
In any case it is easy to deliver and install a new online map source without creating a new Little Navmap release. See Map Themes for more information.
The following map themes are included per default:
- CARTO Dark Matter
A dark map. Map tiles and style by CARTO. Data by OpenStreetMap, under ODbL.
- CARTO Positron
A very bright map called Positron which allows to concentrate on the aviation features on the map display. Map tiles and style by CARTO. Data by OpenStreetMap, under ODbL.
- open flightmaps
A high quality VFR map provided by open flightmaps. Note that details are visible at lower zoom distances smaller than 50 NM or 100 km.
- OpenStreetMap
This is an online raster (i.e. based on images) map without hill shading. The tiles for this map are provided by OpenStreetMap. Data by OpenStreetMap, under ODbL.
- OpenTopoMap
An online raster map that mimics a topographic map. Includes integrated hill shading and elevation contour lines at lower zoom distances. The tiles for this map are provided by OpenTopoMap.
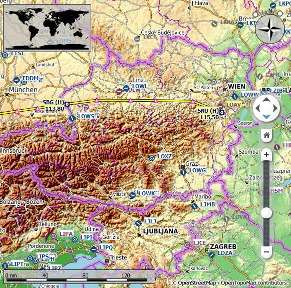
View at the eastern Alps using OpenTopoMap theme. A flight plan is shown north of the Alps.
- Stamen Terrain
A terrain map featuring integrated hill shading and natural vegetation colors. The hill shading is available worldwide. Map tiles by Stamen Design, under CC BY 3.0. Data by OpenStreetMap, under ODbL.
View showing Stamen Terrain theme.
- Political Map (Offline)
This is an offline political map using colored country polygons. Boundaries and water bodies are depicted coarse. The map included in Little Navmap has an option to display city and country names.
- Plain Map (Offline)
A very simple offline map. The map is included in Little Navmap and has an option to display city and country names. Boundaries and water bodies are depicted coarse.
- Atlas (Offline)
A very simple offline map including coarse hill shading and land colors. The map is included in Little Navmap and has an option to display city and country names. Boundaries and water bodies are depicted coarse.
- Mapbox Outdoors, Mapbox Satellite, Mapbox Satellite Streets, Mapbox User, MapTiler Topo, Thunderforest Atlas and Thunderforest Landscape
These maps require a registration at the respective sites to get access to the map tiles. You can enter the keys in
Optionson page Map Display Keys which also contains direct links to the login pages.
12.13. Context Menu Map
The map context menu can be activated using right-click or the menu key. Menu items are enabled or disabled depending on selected object and some menu items contain the name of the selected map object for clarification.
Mouse click modifiers like Ctrl+Click are shown as a hint on the right side of the
context menu.
Little Navmap automatically inserts a sub-menu replacing the menu item if more than one appropriate map object was found below the cursor. This helps to select the right airport from a dense map which displays many airports in one spot, for example.
Some menus add an additional item Position to the sub-menu which inserts a plain position
instead of the navaid or an airport at the clicked position.
Menu items are disabled if their function does not apply to the clicked map object. Hints showing the reason are
appended to the menu text like (has not procedure) for an airport.
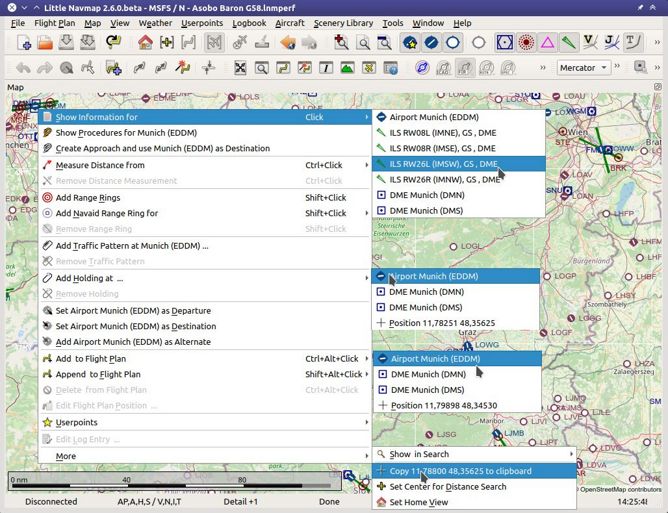
The various sub-menus of the map context menu. Image based on Little Navmap 2.6.19. Click image to enlarge.
Tip
Look at the left side of this online user manual to see all the menu items in a tree like structure.
12.13.1.  Show Information
Show detailed information in the Information dock window for the
nearest airport, airway, airspace, navaid or aircraft which name is shown in the
menu item.
If you like to see information on all objects nearby a click position do a single left click into the map.
See Information for details.
12.13.2.  Set as Departure
This is active if the click is at an airport symbol center, an airport parking position center or a fuel box. It will either replace the current flight plan departure or add a new departure if the flight plan is empty.
The airport and parking position will replace both the current departure and start position if a parking position is clicked within an airport diagram.
12.13.3.  Set as Destination
This menu item is active if the click spot is at an airport. It will either replace the flight plan destination or add the airport to the plan if the flight plan is empty.
12.13.4.  Set as Alternate
This menu item is active clicked at an airport. Selecting this item adds the airport as an alternate to the current flight plan.
More than one alternate can be added to the flight plan. Legs to the alternate airports originate all from the destination.
This menu item is disabled if airport is selected as destination or already an alternate.
The distance to the farthest alternate is considered in the fuel calculation.
Note that you have to activate an alternate leg manually if you would like to fly it (see Activate Flight Plan Leg).
12.13.5.  Set Departure Runway
Selecting a departure runway also adds a departure flight plan leg depicting the extended runway center line. The length of the extended center line can be adjusted in the dialog window. See Departure and Destination Runway for more information.
The text of this menu item varies depending if the airport is already the departure in the flight plan or not.
12.13.6.  Set Destination Runway
Selecting a destination runway add a final approach leg and which can be customized by changing altitude at final, length and offset angle. This allows Little Navmap to give vertical guidance and to show ILS and/or VASI slopes at the destination. See Departure and Destination Runway for more information.
The text of this menu item varies depending if the airport is already the destination in the flight plan or not.
12.13.7.  Show Procedures
Open the procedure search tab of the search dock window and displays all procedures for the airport.
The menu item text varies depending if the airport is a part of the flight plan.
See Search Procedures for more information.
12.13.8.  Insert Procedure
Active if clicked on a waypoint of the procedure preview (see Preview all Procedures and Search Procedures). Allows to add a SID, STAR or approach procedure with their respective transitions to the flight plan.
12.13.9.  Add Position to Flight Plan
Insert the clicked object into the nearest flight plan leg. The object will be added before departure or after destination if the clicked position is near the flight plan end points.
The text Position in the menu is replaced with an object name if an airport,
navaid or userpoint is at the clicked position.
An user defined flight plan position (green square) is added to the plan if no airport or navaid is near the clicked point.
An userpoint is converted to an user defined flight plan position if added to the plan.
Note
You cannot edit flight plan legs that are a part of a procedure or between procedures. Procedures will not be deleted or modified by this function.
Tip
All information from a userpoint like remarks, ident, region and name are copied to the
flight plan position if you right click on a userpoint and select Add Position to Flight Plan
or Append Position to Flight Plan.
12.13.10. Append Position to Flight Plan
Same as Add Position to Flight Plan but will always append the
selected object or position after the destination or last waypoint of
the flight plan. Otherwise the same as Add Position to Flight Plan.
This will remove STAR and approach procedures from the current flight plan, if any.
12.13.11.  Delete from Flight Plan
Delete the selected airport, navaid or user flight plan position from the plan. This can be departure, destination, alternate airport, an intermediate waypoint or a procedure.
Deleting a waypoint of a procedure removes the procedure and its transition. Deleting a waypoint of a transition removes only the transiton but not the related procedure.
This also applies to the runway extension legs when selecting a departure or destination runway (Departure and Destination Runway).
12.13.12.  Edit Flight Plan Position or Edit Flight Plan Position Remarks
Two options exist depending on the waypoint type:
Edit Flight Plan Position Remarks: Add remarks to a flight plan waypoint which is not an alternate airport and not a part of a procedure. See Edit Flight Plan Remarks.Edit Flight Plan Position: Change the ident, name, remarks or position of an user defined flight plan waypoint. See Edit Flight Plan Position. You can edit the coordinates directly instead of dragging the flight plan position (Map Flight Plan Editing). See Coordinate Formats for a list of formats that are recognized by the edit dialog.
12.13.13.  Measure Distance from here
Starts to draw a measurment line which gets fixed on a second click.
See Measure Distance and User Features for more information.
12.13.14.  Add Range Rings
Opens a dialog which allows to set the parameters for one or more range rings.
See Range Rings and User Features for more information.
The display of range rings is automatically enabled in menu View -> User Features ->
Range Rings after using this function.
12.13.15.  Add Navaid Range Ring
Show a ring around the clicked radio navaid (VOR or NDB) indicating the navaid’s range. A label shows ident and frequency and the ring color indicates the navaid type.
The display of range rings is automatically enabled in menu View -> User Features ->
Range Rings after using this function.
See Range Rings and User Features for more information.
Note that the accuracy of radio navaid range varies across different simulators.
12.13.16.  Add Traffic Pattern
This menu item is enabled if clicked on an airport. Shows a dialog that allows to customize and display an airport traffic pattern on the map.
See Traffic Patterns and Airport Traffic Pattern in the map legend.
The display of traffic patterns is automatically enabled in menu View -> User Features ->
Traffic Patterns after using this function.
12.13.17.  Add Holding
Display a holding pattern at any position on the map. The hold may also be attached to navaids. Opens a dialog for customization if selected.
See chapter Holdings and Holding in the map legend for more information.
The display of user holdings is automatically enabled in menu View -> User Features ->
Holdings after using this function.
12.13.18.  Add MSA Diagram
Adds a to-scale MSA diagram when right clicking on the smaller MSA symbol at an airport, navaid or other feature.
The display of user MSA diagrams is automatically enabled in menu View -> User Features ->
MSA Diagrams after using this function.
See Minimum Sector Altitude and Navaids in the map legend for more information.
12.13.19.  Remove User Feature
Removes a map feature added by the user.
Removes the selected measurment line. This menu item is active if you right-click on the end point of a distance measurement line (small cross).
Removes the selected range rings from the map. This menu item is active if you right-click on the center point of a range ring (small circle).
Enabled if clicked on the airport traffic pattern hotspot (white filled circle at runway threshold) which is indicated by a hand cursor.
Enabled if clicked on the holding hotspot (holding fix, white filled triangle) which is indicated by a hand cursor.
Removes the selected MSA diagram from the map. This menu item is active if you right-click on the hotspot of a user added MSA diagram (small circle in center).
12.13.20.  Mark Airport as Add-on
Marks an airport with a yellow circle as add-on.
This function will add a userpoint of type Addon ![]() filled with the airport information at the clicked airport position.
Note that the userpoint is not attached to the airport and will not be hidden with airports and is not affected by airport filters.
filled with the airport information at the clicked airport position.
Note that the userpoint is not attached to the airport and will not be hidden with airports and is not affected by airport filters.
You can add you own userpoint type names starting with Addon to create more add-on categories. See Icons for more information.
See chapter Userpoints for more information how to edit or remove the highlight.
12.13.21.  Userpoint
12.13.21.1.  Add Userpoint
Add an user defined point to the userpoints. A dialog shows up where more information can be entered. Some fields of the userpoint dialog are populated automatically depending on the clicked map object and previously added userpoints.
Coordinates are always filled-in. If the selected object is an airport
or navaid, an userpoint of type Airport ![]() or
or Waypoint ![]() respectively
is created and the fields Ident, Region, Name and Altitude are
filled-in. The same applies to NDB
respectively
is created and the fields Ident, Region, Name and Altitude are
filled-in. The same applies to NDB ![]() , VOR
, VOR ![]() and other navaids.
and other navaids.
If the selected position is empty map space, an userpoint of type
Bookmark ![]() is created at this position. Altitude is only filled-in if GLOBE
offline elevation data is installed. See Install GLOBE elevation data.
is created at this position. Altitude is only filled-in if GLOBE
offline elevation data is installed. See Install GLOBE elevation data.
See Add Userpoints for more information.
12.13.21.2.  Edit Userpoint
Open the edit dialog for an userpoint. Only enabled if the selected object is an userpoint. See Edit Userpoints.
12.13.21.3.  Move Userpoint
Move the userpoint to a new position on the map. Only enabled if the selected object is an userpoint.
Left-click to place the userpoint at the new position. Right-click or press the escape key to cancel the operation and return the userpoint to its previous position.
12.13.21.4.  Delete Userpoint
Remove the user defined waypoint from the userdata. The action can be undone in the main menu Userpoint.
Only enabled if the selected object is an userpoint.
12.13.22.  Edit Log Entry
Active when clicked on the blue great circle line, the blue flight plan preview or an airport of a logbook entry highlight.
Allows to edit the respective logbook entry. See Edit Logbook Entry.
12.13.23.  Fullscreen Map
Same as Fullscreen Map. Only visible in fullscreen mode.
12.13.24. More
12.13.24.1.  Jump to Coordinates
Same function as in main menu Map -> Jump to Coordinates.
See Jump to Coordinates for more information.
12.13.24.2.  Show in Search
Show the nearest airport, navaid, userpoint, online client or online center in the search dialog. The current search parameters are reset in the respective tab.
12.13.24.3.  Copy to Clipboard
Copies the coordinates at the clicked position into the clipboard.
The coordinate format depends on the selection in Options on page Units.
12.13.24.4.  Set Center for Distance Search
Set the center point for the distance search function. See Distance search. The center for the distance
search is highlighted by a ![]() symbol.
symbol.
The symbol cannot be hidden. Set it at a remote position if you like to hide it.
Note that the symbol is only an indicator for the search center position and does not have a context menu or a mouse action attached.
12.13.24.5.  Set Home View
Set the currently visible map view as your home view. The center of the home area is highlighted by a ![]() symbol.
symbol.
You can jump to the home view by using main menu Map -> Goto Home.
The symbol cannot be hidden. Set it at a remote position if you like to hide it.
Note that the symbol is only an indicator for the home view center position and does not have a context menu or a mouse action attached.