6. User Interface
6.1. Terms
Button is used for buttons or other texts from the Little Navmap user interface.
Menu -> Sub-menu -> Menu Item denotes paths through the main menu or a context menu.
See Glossary for terms.
6.2. File Associations
The Windows Installer optionally creates file associations for Little Navmap’s own file types as well as often used flight plan types.
This means you can double click a LNMPLN, PLN or FMS file in Windows Explorer and Little Navmap is either started or an already running instance is used to load a flight plan or another file.
This works on all supported operating systems. All you have to do is assign Little Navmap to a file extension or a file type. The actual process can differ across operating system and Linux desktop.
See Command Line Options for more information.
6.3. Dock Windows
See the chapter Dock Windows for more information about using dock and floating windows.
6.4. Tabs
See Tabs for information about the context menu and how to configure and arrange tabs.
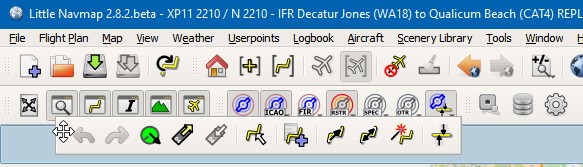
6.5. Toolbars
Toolbars are also movable by clicking on the left handle and can also be
closed or detached from the main window similar to the dock windows.
Toolbars can also be opened and closed in the main menu Window.
All toolbars have a right click context menu where different toolbars can be shown or hidden.
A toolbar gets an overflow button >> on the right side if it is too long to show in the main window. Click >> to see the remaining buttons.
Moving a toolbar into a new position.
Moving a toolbar into a new vertical toolbar at the left side of the main window.

The main window it too small to show the whole toolbar. Clicking the overflow button >>.
Note
Use the Window menu in the in the main menu to save, load or restore
windows, toolbars and tabs layouts.
The menu item Reset Window Layout in the menu Window can be used to reset the state and position of all dock
windows and toolbars back to their default.
6.6. Statusbar
The statusbar at the bottom of the window displays various information.
Shown or hide it in the menu Window -> Statusbar.
See chapter Statusbar for more on the shown information.
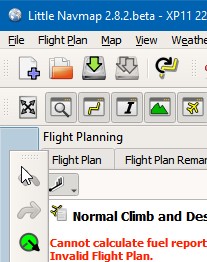
6.8. Warning and Error Messages
Little Navmap shows error messages with white text on red background for problems with the aircraft performance, top of descent/climb calculation or other issues.
Tooltips on these error messages give more help in most cases. Click these messages or hover the mouse cursor above to see more information.
Orange warning messages show hints about less severe issues.
These message are shown in the Statusbar, Flight Plan Table fields, Error Messages Footer, Tab Progress, Connect Dialog and other places.
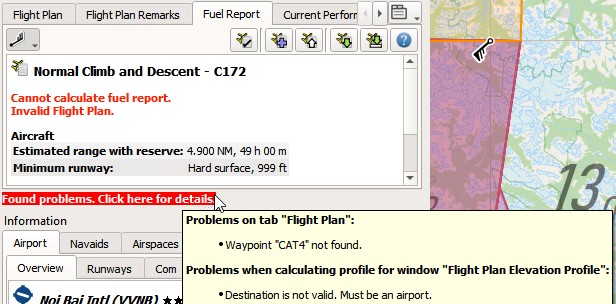
A red error message in the flight plan footer and a orange warning message in the flight plan fuel report.
6.9. Tables
The header of table views allows the following manipulation:
Click on the top left corner of the column header: Select all result rows.
Click on a column header: Sort ascending or descending (only for search result tables - not for flight plan table).
Click and drag on the column header: Change column order.
Double-click on column border: Automatically fit column size to content.
Click and drag on column border: Change column width.
Click into the empty space below all rows: Deselect all entries and remove highlights on the map.
The above applies to most table views in the program and partially also to the tree view of the procedure search.
The program saves the sort order, column widths and positions until
Reset View is selected in the related context menu.

Table header of the flight plan table with tooltip.
6.10. Trees
Some configuration dialogs uses a tree element. You have to click on the small right pointing arrow (► or +
depending on operating system and user interface style) to open a branch with options.
Select checkboxes on the left to enable or disable features. Explanations are given in the right column.
You can also click on the small checkbox in the branch root to select or unselect all elements of the branch.
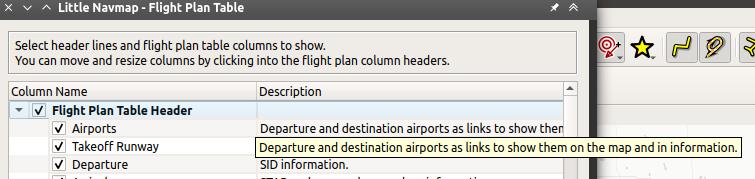
Tree for flight plan table display configuration. Shows tooltip for cut off explanation.
Branch checkbox for Flight Plan Table Header is selected and indicates all items in branch enabled.
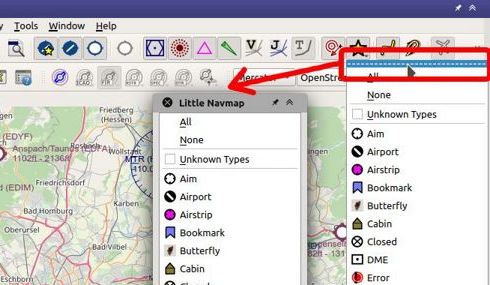
6.12. Menu Buttons
Menu buttons ![]() provide dropdown menus on click. These are used in the Search and Flight Plan Route Description windows, for example.
provide dropdown menus on click. These are used in the Search and Flight Plan Route Description windows, for example.
6.13. Tooltip Help, Help Buttons and Help Menu
The help menu of Little Navmap contains links to the online help, an included offline help PDF document, online tutorials and the map legend.
The program uses tooltips to provide help or to display more information on buttons and other controls. Tooltips are small labels which pop up if you hover the mouse above a control like a button or text edit field.
A more detailed description is also shown on the left side of the Statusbar if you hover the mouse over a menu item.
Almost all dialogs and dock windows have buttons which are labeled Help or use the icon ![]() .
Clicking these will open the corresponding sections of the online manual.
.
Clicking these will open the corresponding sections of the online manual.
6.14. Window Title
The main window title shows the following information:
Application name
Version
Build type (for Windows only):
64-bit(use this with MSFS and all X-Plane versions) or32-bit(use this with FSX and P3D).Selected simulator scenery library database (
FSX,FSXSE,P3DV3,P3DV4,P3DV5,MSFS,XP11orXP12) and AIRAC cycle if available. In parentheses if not used.Selected navigation database (Navigraph:
N) and AIRAC cycle. In parentheses if not used.Loaded flight plan file name plus a
*if changed. Only*is shown if plan was not saved yet. Flight plan will be auto-restored on next startup.Loaded aircraft performance file a
*if changed.Selected online network connection if used.
The AIRAC cycle is shown as a four digit number after the simulator and Navigraph database indication if available and if a database is selected.
The AIRAC cycle is only shown for X-Plane and Navigraph databases. Other simulators do not provide cycle information in their scenery libraries.
A N will be appended if the Navigraph database is used. Otherwise (N) is used. Example
below for Prepar3D:
P3DV5 / (N): All features on the map and all information in dialogs and windows come from the flight simulator database. Navdata might be limited depending on simulator.P3DV5 / N: Airports and ILS are shown and used from the flight simulator database. Navaids, airways and procedures are used from the Navigraph database.(P3DV5) / N: All data is used from the Navigraph database. No aprons, no taxiways and no parking positions are available for airports.
See Scenery Library Menu, Load Scenery Library and Navigation Databases for more information.
Examples:
Little Navmap 2.6.8 64-bit - XP11 2001 / N 2011 LOAG_LOWW.lnmpln * - PA30 Twin Comanche.lnmperf - VATSIM
Version 2.6.8, new 64-bit Windows build, X-Plane selected with AIRAC cycle 2001, Navigraph database in use with AIRAC cycle
2011, flight plan LOAG_LOWW.lnmpln changed and performance profile PA30 Twin Comanche.lnmperf unchanged. Connected to VATSIM network.
Little Navmap 2.6.4.beta - (XP11) / N 2012 IFR Frankfurt Am Main (EDDF) to Fiumicino (LIRF).lnmpln - PA30 Twin Comanche.lnmperf *
Version 2.6.4.beta (a test version), X-Plane not selected - using Navigraph only, Navigraph database in use with AIRAC cycle
2012, flight plan unchanged and performance profile PA30 Twin Comanche.lnmperf changed.
Little Navmap 2.6.5.rc1 32-bit - FSX 2012 / (N) - *
Version 2.6.5.rc1 (a release candidate), 32-bit version as required for FSX, FSX selected, not using Navigraph, no flight plan loaded and new and empty default performance profile loaded.
6.15. Information and Simulator Aircraft Text
You can change the text size permanently in the options dialog for these windows. See options dialog on page Display and Text.
This page also allows to change the font for the whole program interface.
Tip
A quick way to change the text size is to use the mouse wheel and
Ctrl key. This setting won’t be saved across sessions, though.
6.16. Activating and raising Windows and Tabs
Little Navmap opens and raises dock windows and tabs for certain
actions like File -> New Flight Plan or Aircraft ->
Open Aircraft Performance to avoid confusion for new users. This
behavior can be disabled in the options dialog on tab User Interface
by disabling the option Raise related windows on actions. Show flight plan after opening file, for example..
6.17. Tear off Dropdown Menus
Toolbar buttons with a drop down menu and other buttons like Flight Plan Route Description allow to tear off the menu by clicking on the dashed line on top of it.
This will move the menu into a separate window and allows to quickly change several options at once.
The state of the tear off menus is not saved.
The drop down menu button for the userpoint categories for map display and how the menu can be teared off into its own window.
6.18. Copy and Paste
Almost all dialogs, text labels and all information windows in Little Navmap allow to copy and paste the formatted text to the clipboard.
You can select the text using the mouse and then either use Ctrl+C
or the context menu to copy it to the clipboard.
The table views for the flight plan or airport/navaid search results allow copying of the results in CSV format to the clipboard which can be pasted into a spreadsheet program like LibreOffice Calc or Microsoft Excel.
6.19. Translation and Locale
Little Navmap is currently available in several languages, although not all translations are complete.
Your system language is used if supported. Otherwise Little Navmap falls back to English.
The language for the user interface can be change in Options on page User Interface.
I will happily support anybody who would like to translate the user interface or manual into another language. Language packages can be added to a Little Navmap installation later once they are available. See Translating in the GitHub Little Navmap wiki for more information.
Despite using the English language in the user interface the locale settings of the operating system will be used. So, e.g. on a German version of Windows you will see comma as a decimal separator instead of the English dot.
The language and locale settings can be forced to English in the dialog
Options on the page User Interface.
6.20. Map Legend
The legend explains the Map Display and the Elevation Profile symbols. It is available in Legend.
6.21. Airport Rating
Airports get a zero to five star rating depending on facilities which is shown in airport search, map tooltips and the information window.
Airports that have no rating will be displayed
using a gray symbol below all other airports on the map
(Empty Airport). This behavior can be switched off in the
Options dialog on the page Map.
This helps to avoid airports with no scenery elements.
The criteria below are used to calculate the rating. Each item gives one star:
Add-on (or 3D for X-Plane)
Parking positions (ramp or gate)
Taxiways
Aprons
Tower building (only if at least one of the other conditions is met).
All airports that are not located in the default Scenery directory
of FSX/P3D or are located in the Custom Scenery directory of X-Plane
are considered add-on airports which raises the rating by one star.
Airports having the 3D label in
X-Plane are 3D airports which raises the rating by one star too.
All additional airports in MSFS Community and Official directories are considered add-on.
Star airports in Microsoft Flight Simulator 2020 will always get a five star rating.
Add-on airports are highlighted on the map with a yellow ring which can be disabled in the options dialog on page Map Display.
Using emphasized (bold and underlined) text highlights add-on airports in the search result table, flight plan table, information windows and map tooltips.