65. Tutorial - Building an IFR Flight Plan with Approach Procedures
This tutorial will show you how to create a more complex IFR flight plan including approach procedures. It introduces the advanced airport search functionality and the automatic flight plan calculation.
The flight plan is included in the Little Navmap installation directory:
.../Little Navmap/etc/Tutorial IFR Bembridge (EGHJ) to Wick (EGPC).lnmpln.
While this tutorial looks quite lengthy it is normally a matter of half a minute to get a flight plan if you know where to go. The planning effort shown here is bigger to highlight some of the more advanced features of Little Navmap.
You should at least read through Tutorial - Building a VFR Flight Plan before doing this one.
Note
The flight plan will go across the UK using an IFR capable aircraft. Its maximum range should be more than 600 NM including reserves and a cruise altitude of 10,000 ft.
Note that Bembridge has a relatively short runway of 2,729 ft. You probably need a small turboprop or a powerful twin.
Do not try to fly this trip with an airliner.
The tutorial assumes the following preconditions:
You left your aircraft at
Bembridge (EGHJ)at the end of the last flight or think of it as you home base.You don’t know where you want to fly today.
You know the requirements for your aircraft:
Maximum range
Minimum runway length
Hard runways
Needs a parking spot at the destination
Fuel for return trip
65.1. Prepare Flight
Use Flight -> Reset all for a new Flight
![]() before each flight to get a clean base for
fuel calculation and other functions. Uncheck
before each flight to get a clean base for
fuel calculation and other functions. Uncheck
Create an empty flight plan in the dialog if the flight plan is
already loaded.
65.2. Default Aircraft Performance
This tutorial does not cover creating or collecting aircraft performance files. See Tutorial - Creating an Aircraft Performance Profile if you like to do this.
Therefore, we will simply use a slightly modified aircraft performance profile which allows to calculate the top of climb and top of descent.
Select
Aircraft-> New Aircraft Performance .
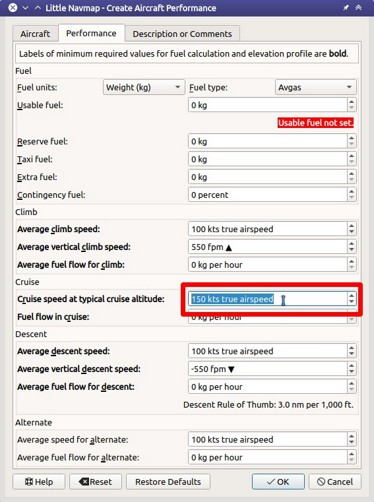
.Optional: Select Edit Aircraft Performance from the same menu as above and change the values fuel flow and speed at climb cruise and descent to roughly match your aircraft. Add reserve fuel for about one hour or cruise fuel consumption for now. This helps to get an estimate for the traveling time. Fill the other fields too if you know the performance values.
Accept by pressing
OKin the dialog.
You might see warnings in the fuel report. Ignore these for now since the aircraft performance is sufficient to calculate the top of descent and top of climb for the elevation profile.
Tip
Lookup numbers at the Aircraft Performance Database or download a community made performance file from Little Navmap Downloads - Aircraft Performance.
65.3. Cleanup Search
Go to the dock window Search and follow the steps below:
Right-click into the result table and select Reset Search
 to remove of all search criteria that may affect the query.
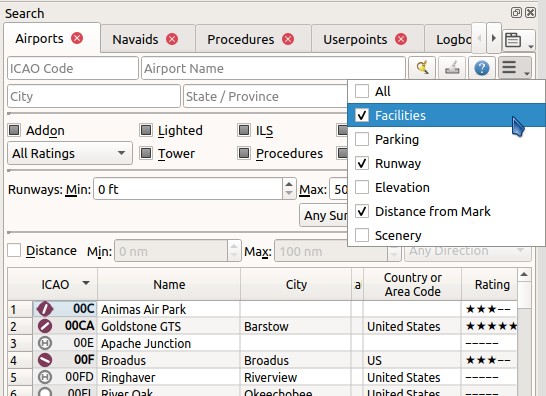
Click the menu button
 and make sure that the search
groups
and make sure that the search
groups Facilities,RunwayandDistance from Markare checked. Deselect all others you do not need.
65.4. Assign Departure
Now look for the departure airport:
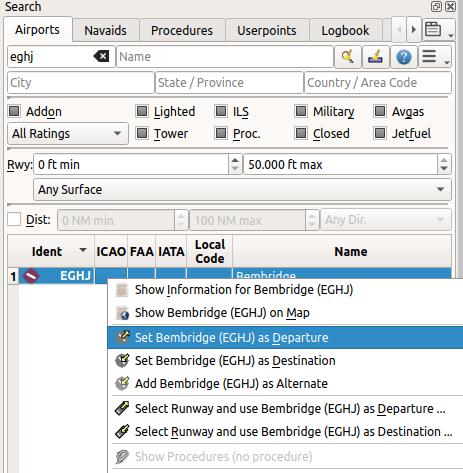
Enter
EGHJin theICAO Codesearch field on the top left (case does not matter).Right-click on the airport in the result table.
Choose
Set as Departure . This will assign the airport center point as a start position.
The flight plan has one entry now. This is already sufficient if you want to fly a pattern and like to see distance, speed and time information to the airport.
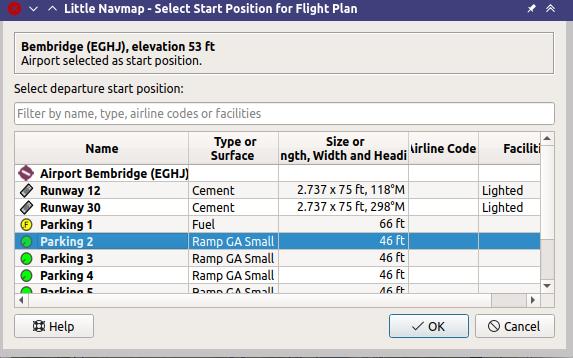
Now select a parking position:
Go to
Flight Plan-> Select a Start Position .
.Choose one of the GA small ramp positions.
Click
OKand the position will be highlighted on the map.
You can also select the start position directly on the map context menu as described in Tutorial - Building a VFR Flight Plan. See also Set as Departure.
65.5. Search for Destination
Right-click into the result table and select Reset Search ![]() to remove of all search criteria from the recent search.
to remove of all search criteria from the recent search.
Now look for a suitable destination airport:
Right-click on
EGHJin the search result again.Select
Set Center for Distance Search . You can also do this in the map. This is the center point
for the spatial search.
. You can also do this in the map. This is the center point
for the spatial search.Clear the
Identsearch field on the top left of the search window now. It is a common mistake to leave the text fields filled when doing distance searches which will give you an empty result table.
We will now look for airports that are in range of the aircraft but not too close. Also, certain criteria have to be fulfilled, like a runway which is long enough and has the right surface.
You can also find airports in aircraft range by using the range rings
where you can right-click into the map on your departure airport and
select Add Range Rings ![]() .
.
We will use the spatial search instead of range rings since we’d like to see only suitable airports for out aircraft.
Check the following in the airport search tab:
Rating: We’d like to get airports that are either add-ons or have basic scenery requirements as taxiways, parking spots and more. Select the one with at least four stars. You can also select3Dif you fly X-Plane.Procedures: Show only airports that have procedures like SID, STAR or approaches.Deselect
MilitaryandClosed(click the checkboxes twice): This will return only civilian airports and avoid airports that have all runways closed.Select
Any is Hardin the buttonAny Surfaceto avoid airports having only soft surfaced runways.Select a minimum runway length of 2,500 ft or whatever you chosen aircraft needs in the field
Runways:Min:.
See also Search for general information about searching for airports, navaids and other features.
You can also limit the maximum runway length if you are looking for a short landing challenge.
The search result changes on the fly while doing all these adjustments, though we are not there yet:
Check
Dist:to activate the spatial search.Change the maximum distance to 600 NM and the minimum to 400 NM (to avoid short hops). The result table will now update with a small delay since the distance search is more complex.
To find only airports north of your position select
Northin the buttonAny Dir.. Note that the search result is sorted by distance with the closest airport first per default.Choose an airport for your trip. Use
Wick (EGPC)for this tutorial.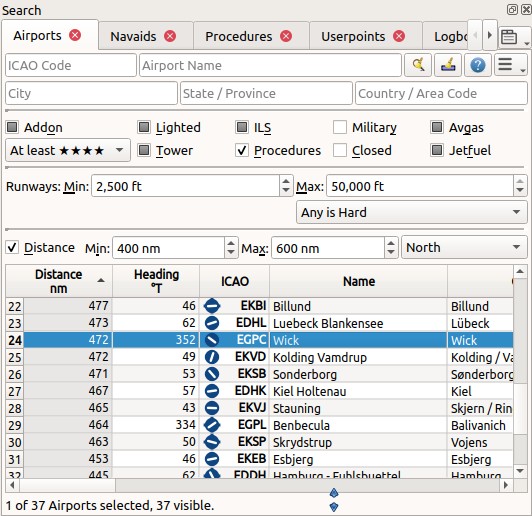
Right-click on Wick in the result table and select
Show Information . This will fill the
tabs in the dock window
. This will fill the
tabs in the dock window Information.Select the tab
Airportand below this one the tabWeather. Look for the sectionBest runways for windto get an idea of the expected landing runway. Start any third party weather programs before if you use these.
For this tutorial we assume that the winds favor runway 13.
See also Weather for general information about weather display in Little Navmap.
65.6. Select an Approach Procedure
We’ll select an approach procedure now:
Go back to the search result.
Right-click on the airport Wick again. Select
Show Procedures for . This will pop up the procedure search tab.
Choose
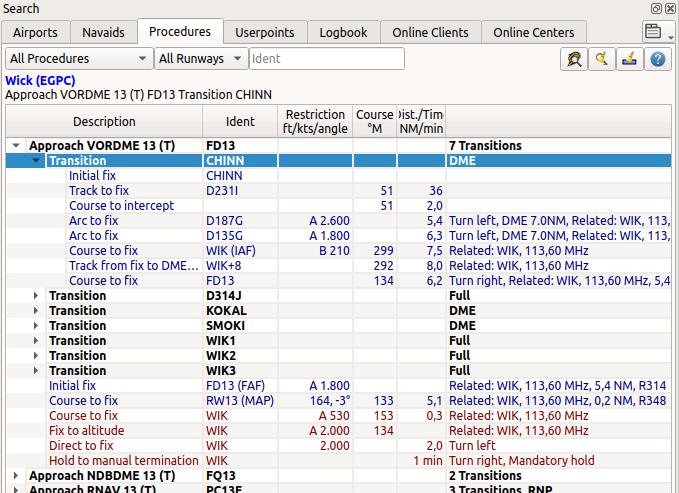
Runway 13in theAll Runwaysbox to see only approaches for 13.Select
Expand Allin the context menu to see also the transitions for each approach.Choose
Approach VORDME 13 FD13usingTransition (Full) CHINNsince we expect to land on runway 13. You can also use any other approach for this runway if VORDME 13 is not available.
The top label in the procedure search shows
Wick (EGPC) Approach VORDME 13 FD13 Transition (Full) CHINN for the
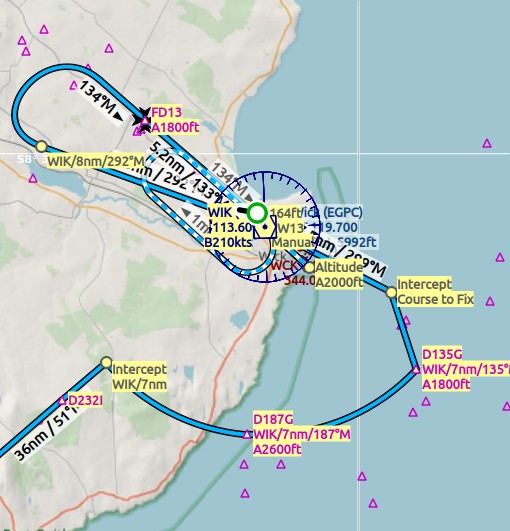
selected approach and/or transition. You can also see a preview on the map.
Right-click on the transition and select
Show on Map (text might be different depending on selection)
![]() . This will center the procedure on the map. You can click on the
legs in the procedure tree to see the start and end points of a leg highlighted on the map.
. This will center the procedure on the map. You can click on the
legs in the procedure tree to see the start and end points of a leg highlighted on the map.
See also Search Procedures and Procedures.
If you like what you see right-click again on the transition and select
Insert into Flight Plan, Use as Destination and Use as Departure (text might be different depending on selection) ![]() .
.
This will do two things:
Add Wick as the destination airport to the flight plan. Any previous destination in the flight plan will be replaced.
Add the approach and its transition to the flight plan. The procedure legs use a dark blue color and the missed approach legs use a dark red color in the flight plan table. Flight plan en-route legs are black. Any previous procedure is replaced with this new one.
About adding transition and approaches: Approaches and transitions are closely related which is already indicated by the tree structure in the procedure search tab. You can add an approach without transition but a transition always belongs to an approach.
65.7. Calculate a Flight Plan
Now we have the departure airport, an approach procedure and the destination all connected by a straight line. Next is the en-route part of the flight plan:
Set
IFRas the flight plan type in the dock windowFlight Planningon tabFlight Plan. This allows the automatic flight plan calculation to adjust the cruise altitude.Click
Flight Plan-> Flight Plan Calculation to open the flight plan calculation floating window.
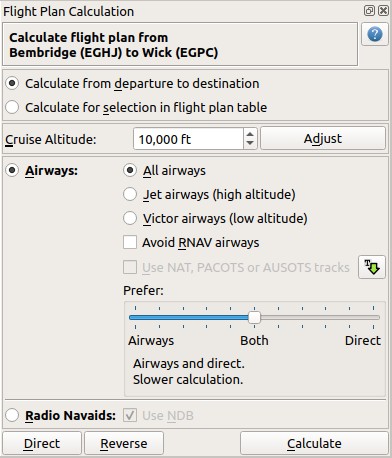
The flight plan cruise altitude is automatically adjusted according to the hemispherical rule (the rule can be changed in
Tools->Options on the page Flight Plan), the altitude
restrictions of the airways and the flight plan type (
on the page Flight Plan), the altitude
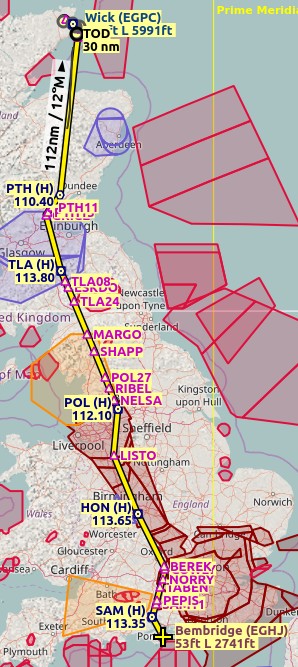
restrictions of the airways and the flight plan type (VFRorIFR). You can see the minimum altitude for each airway segment in the flight plan table in the columnRestriction(see Table Columns). The altitude can be changed according to the hemispherical rule by clicking the Adjust button.Change all settings in the floating window as shown in the screenshot above.
Click the button Calculate.
Use this flight plan for now.
Save the plan using File -> Save Flight Plan as LNMPLN ![]() .
The program usually finds the right directory for the flight plans and
gives a meaningful name by default.
.
The program usually finds the right directory for the flight plans and
gives a meaningful name by default.
The top label in the flight planning dock window reads now:
Bembridge (EGHJ) / Parking 7 to Wick (EGPC)
Arrive via CHINN and VORDME FD13 (D13).
Land at 13, 129°M, 5.215 ft, 126 ft elevation, PAPI4.
Distance 538 NM, time 4 h 35 m.
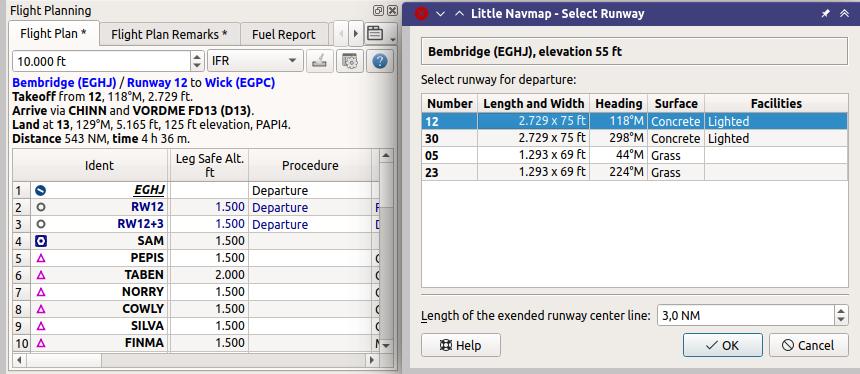
Note that no departure runway information is given. Click Select Departure Runway ![]() on the toolbar to select one and save the plan.
on the toolbar to select one and save the plan.
Below the runway selection dialog and the result in the flight plan table after selecting runway 12 for departure.
You can see the runway start point RW12 and the end of the extended runway center line RW12+3.
The plan looks like shown below.
65.8. Airspaces
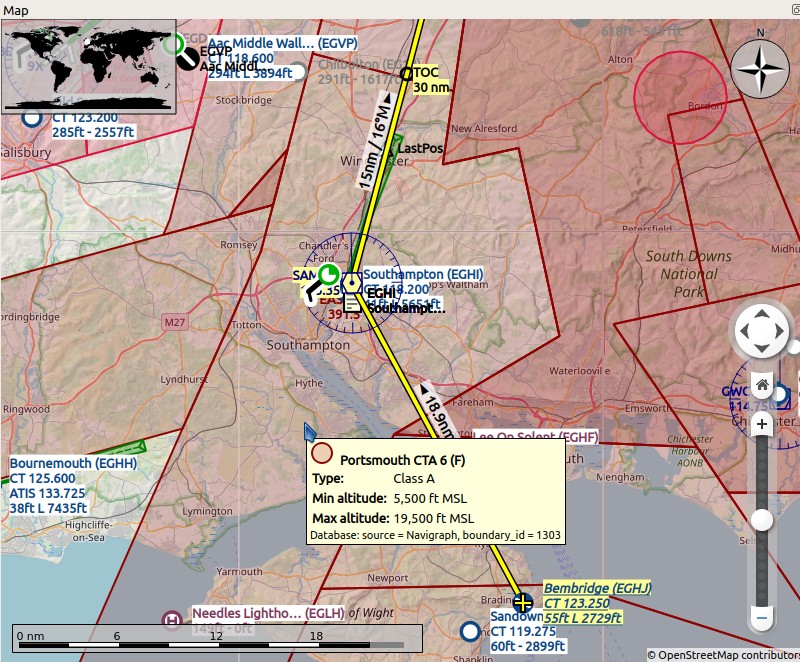
Now you can check if you pass through any airspaces:
Enable airspaces by selecting
View->Airspaces-> Show Airspaces if not already done.
Check
View->Airspaces-> At flight plan cruise altitude in the menu or the toolbar menu
button.
in the menu or the toolbar menu
button.
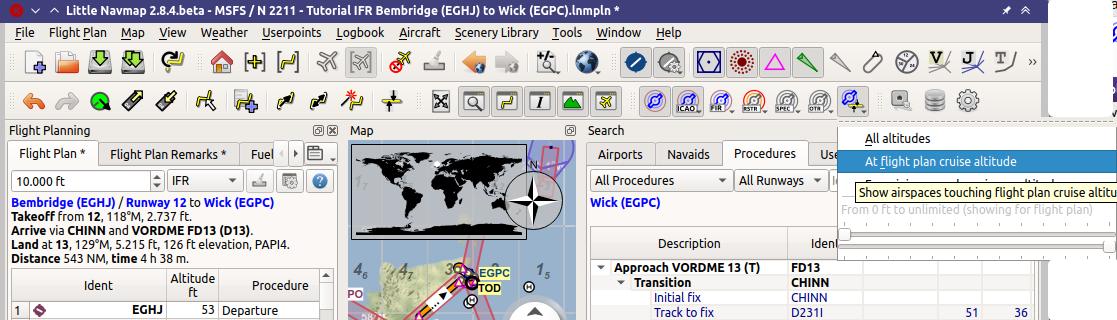
This will display only airspaces on the map that are relevant for your
cruise altitude. You can also select Below 10,000 ft only to see all
relevant airspaces in the climb or descent phase. Use the tooltips on
the map to get information about airspaces like type, minimum and
maximum altitude.
65.9. Saving
Save the plan in the Little Navmap format LNMPLN using File ->
Save Flight Plan ![]() .
The program usually finds the right directory for the flight plans suggests a name
based on departure and destination.
.
The program usually finds the right directory for the flight plans suggests a name
based on departure and destination.
The format LNMPLN is only understood by Little Navmap. You cannot load these files into another program. Therefore, we have to export the flight plan.
Now open the multiexport options dialog by selecting File -> Multiexport Flight Plan Options.
Right click on the simulator format you’d like to export and select Export Flight Plan now ![]() .
Save the file to the right place. The default path is based on best guess.
.
Save the file to the right place. The default path is based on best guess.
See here Quick Setup for information how to quickly configure the multiexport.
65.10. Flying
Follow the steps below to get a moving map and see your aircraft in Little Navmap:
Open the dialog
ConnectusingTools-> Flight Simulator Connection and
check if
and
check if Connect automaticallyis selected. Enable it if not. Little Navmap will find the simulator no matter if it is already started or will be started later.Click on the tab which corresponds to your simulator. Image below shows the tab for FSX, P3D or MSFS on the left and the tab for X-Plane on the right.
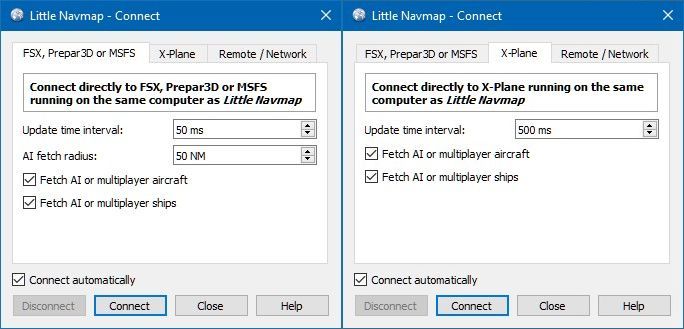
Click
Connectwhich will close the dialog.Enable
Map->Center Aircraft . The map will
jump to the simulator aircraft and keep it centered if an active flight
is loaded, i.e. the simulator is not in the opening screen.
. The map will
jump to the simulator aircraft and keep it centered if an active flight
is loaded, i.e. the simulator is not in the opening screen.Start the simulator if not already done, load the flight plan and go flying.
Important
Make sure you use the right build of Little Navmap.
The 64-bit version shows only MSFS in the connection tab while the 32-bit version shows FSX and P3D.
See also Connecting to a Flight Simulator.
65.11. Top of Descent
A top of descent indication is displayed on the map and in the elevation profile which also shows the distance from top of descent to the destination. This number includes the distance of approach procedures (excluding holds).
Altitude restrictions in procedures are considered in the top of descent calculation.

The tab Progress in the dock window Simulator Aircraft will show
the distance to the top of descent in the Flight Plan Progress
section.
The section Altitude will show the vertical path deviation after
passing the top of descent.
65.12. Changing Procedures
Now the weather has changed requiring an approach to runway 31:
Right-click on the destination airport at the bottom of the flight plan table.
Select
Show Procedures for.Then change the runway filter to
Runway 31.Expand the approach
VORDME 31to see the transition.Select the transition.
The label on top of the window shows now
Approach VORDME 31 FD31 Transition (Full) CHINN.
Right-click on the selected transition.
Select
Use EGPC and Approach and Transition as Destination from the context
menu which will replace the current procedure in your flight plan
with the new one.
from the context
menu which will replace the current procedure in your flight plan
with the new one.
The top label in the flight planning dock window reads now:
Bembridge (EGHJ) / Parking 7 to Wick (EGPC)
Takeoff from 12, 118°M, 2.729 ft.
Arrive via CHINN and VORDME FD13 (D13).
Land at 31, 309°M, 5.031 ft, 126 ft elevation, PAPI4.
Distance 519 NM, time 4 h 26 m.
To remove a procedure from the flight plan:
Select any leg of the procedure in the flight plan table.
Right-click and select Delete Selected Legs or Procedure
 or press the
 Delkey to remove the whole procedure.
Alternatively right click on any fix/waypoint of the procedure on the map
and select Delete from Flight Plan ![]() .
.
If ATC clears you to the initial fix of the procedure:
Delete any intermediate waypoints between your current aircraft position and the initial fix of the procedure: Right-click in the flight plan table and select Delete Selected Legs or Procedure
for all waypoints between your
current aircraft position and the initial fix or start of the
procedure. Avoid deleting your approach (you can also right-click on
a flight plan waypoint on the map and delete it from the context
menu).Then right-click on your aircraft on the map and select Add Position to Flight Plan
.
This will give a direct connection from your current aircraft position to the start of the procedure which you can use to get course and distance to the initial fix.
Below: After changing the approach procedure and adding an user defined waypoint at the aircraft position to the flight plan. Now we get course and altitude indications for a direct leg to the start of the transition (43 NM and 314 degrees magnetic course).

65.13. Going Missed
I recommend hiding the missed approaches on the map by unchecking
View -> Show Missed Approaches ![]() . This
helps uncluttering the map display.
. This
helps uncluttering the map display.
If the missed approach is not shown: The progress window shows distance and time to destination. Activating the next leg (shown in magenta color) will stop if the destination (i.e. the runway threshold) is reached, even when passing the threshold.
If the missed is shown and the aircraft passes the runway threshold: The first leg of the missed approach is activated and simulator aircraft progress will display the remaining distance to the end of the missed procedure.